Step-by-step instructions on how to publish an app on Google Play Store
Google Play has 2.5 billion active users per month in over 190 markets worldwide, making it one of the best app stores for attracting traffic to your app. In this article, we will guide you through the process of publishing your app on the Play Store and how to promote it using ASO (App Store Optimization).
We have prepared a comprehensive guide on publishing android apps on Google Play, in which you will find everything you need to know, including:
- How to create your account in the Google Play Developer Console.
- What to do if you plan to sell in-app purchases.
- How to create your app using the Google Play Console.
- How to address all Google Play requirements for publishing an app.
- Why it is important to use App Store Optimization when creating your app store listing and how to use it effectively.
- How to submit your app for production.
Contents
1. Create your account in Google Play Console
2. Create a Google Merchant Account
3. Create your app
4. Set up your app
5. Choose a category, add the right tags, and fill in contact details
6. Use App Store Optimization to create the best store listings
7. Set up your store listing
8. Submit your app on the Play Store
9. How to publish your app on Google Play
1. Create your account in Google Play Console
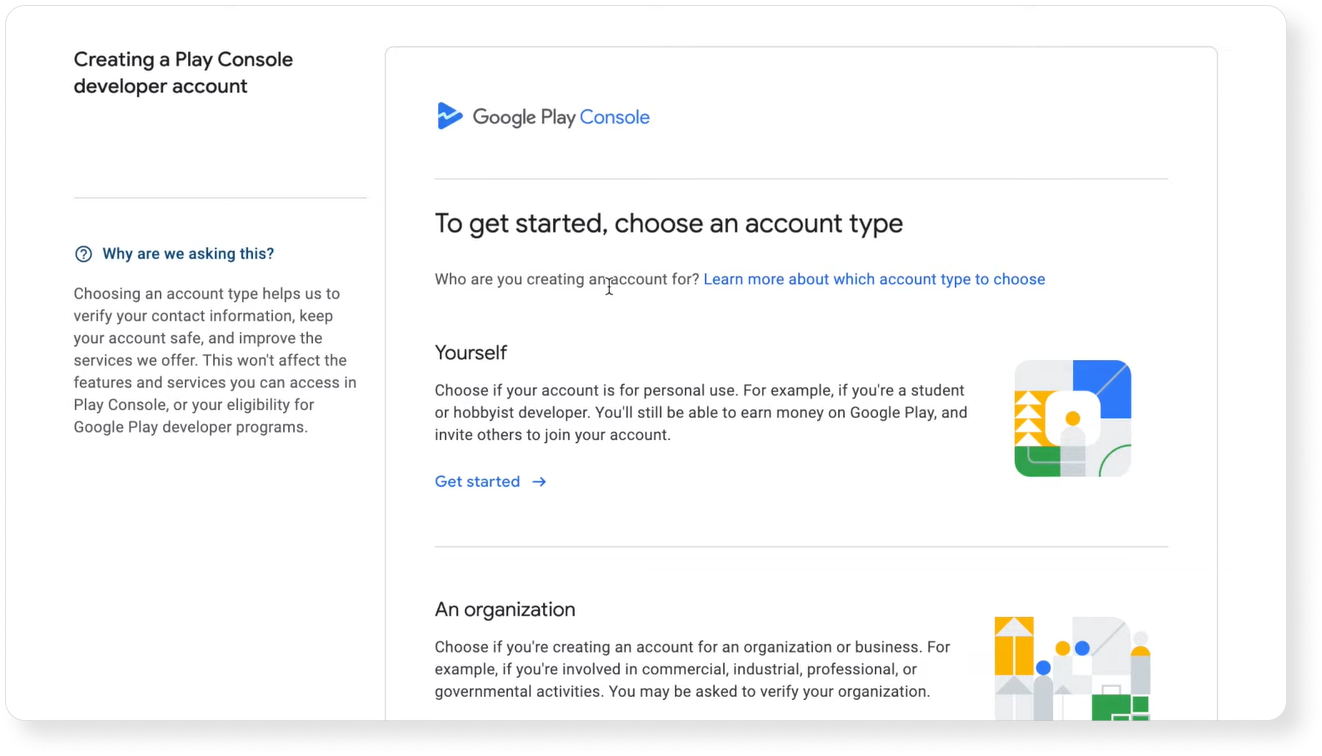
First of all, you need to sign in to the Google Play Console. Visit play.google.com/console to create your account. You will need to choose your account type: Personal or Organizational.
Keep in mind that developers with personal developer accounts must meet specific app testing requirements before becoming eligible to publish their apps on Google Play.
From November 13, 2023, developers who create personal accounts should test their apps with a minimum of 20 testers for 14 days before publishing them. Otherwise, Google will not publish android apps. Some functionalities within the Play Console, like Production and Pre-registration, will remain inaccessible until developers fulfill these prerequisites. Learn how to conduct app testing in the Google Play requirements.
Don’t worry if you need to change your account in the future, you can easily transfer your app to a new account.
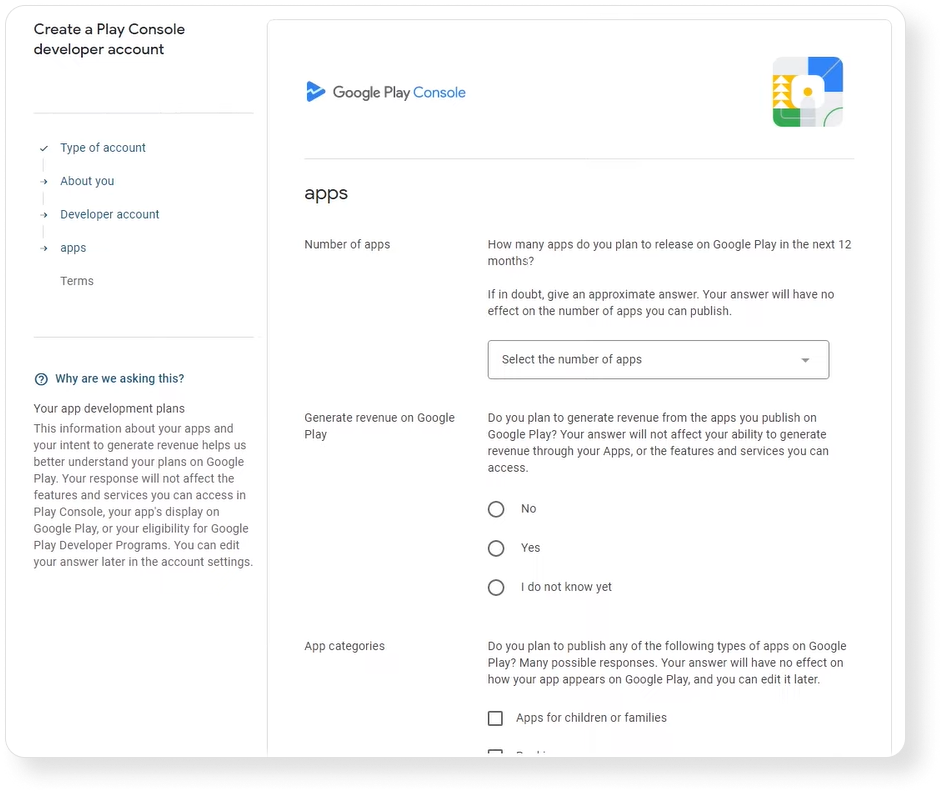
Include some information about yourself when creating a developer account.
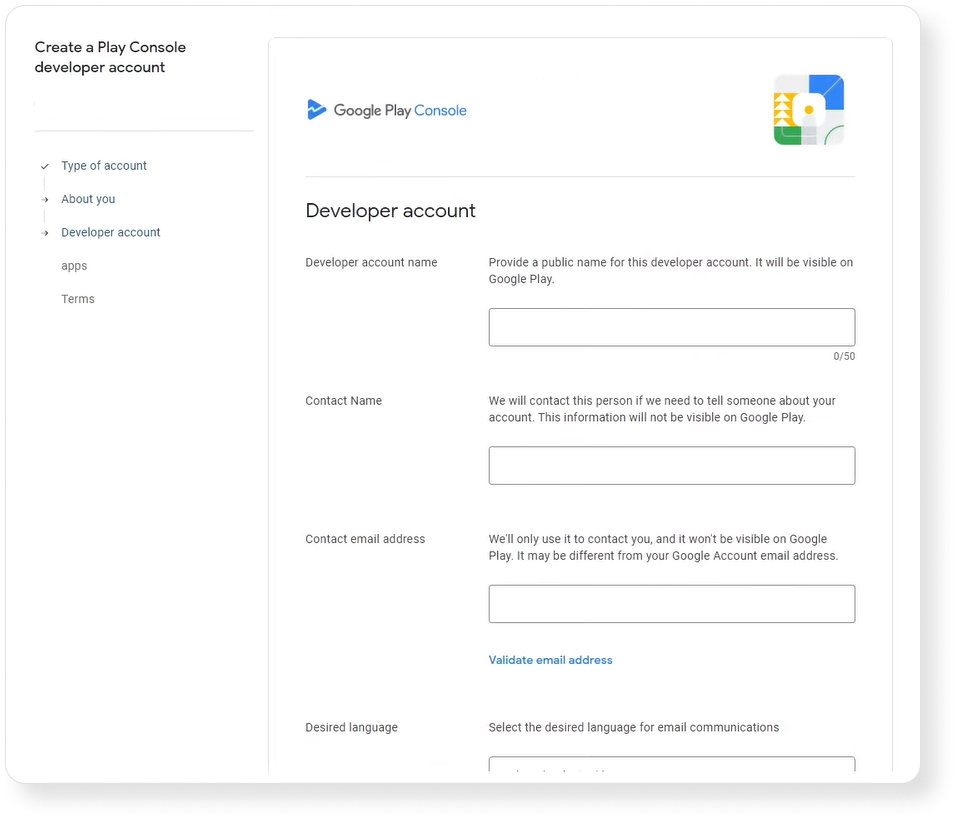
In the “Apps” section you should give Google more information on how many apps you want to publish, if you plan to earn money with them, and the specific categories in which you plan to create apps.
You will need to pay a one-time $25 registration fee, after which you can use this site for free. There is no need to pay when publishing your app on the Play Store.
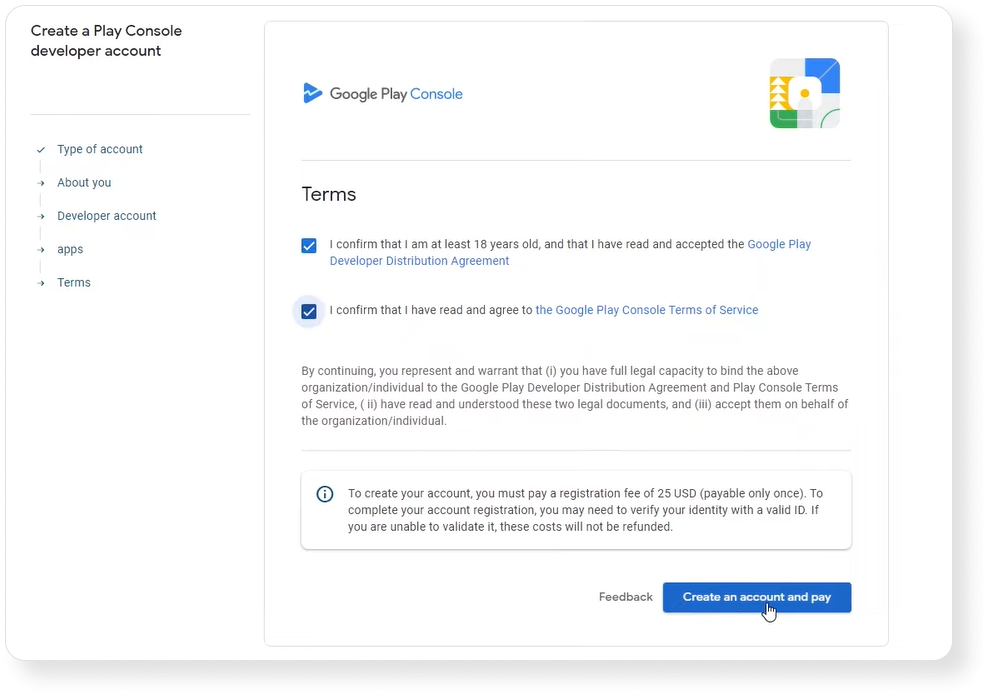
After you submit your account, it may take up to 48 hours for Google to approve it. You can also add or change your account information in the future.
2. Create a Google Merchant Account
If you plan to sell in-app purchases with your app, you should create a Google Merchant Account.
- Log into your Google Play Console account.
- Select “Setup” → “Payment profile”.
- Click on “Create payments profile”, and proceed to complete your profile information.
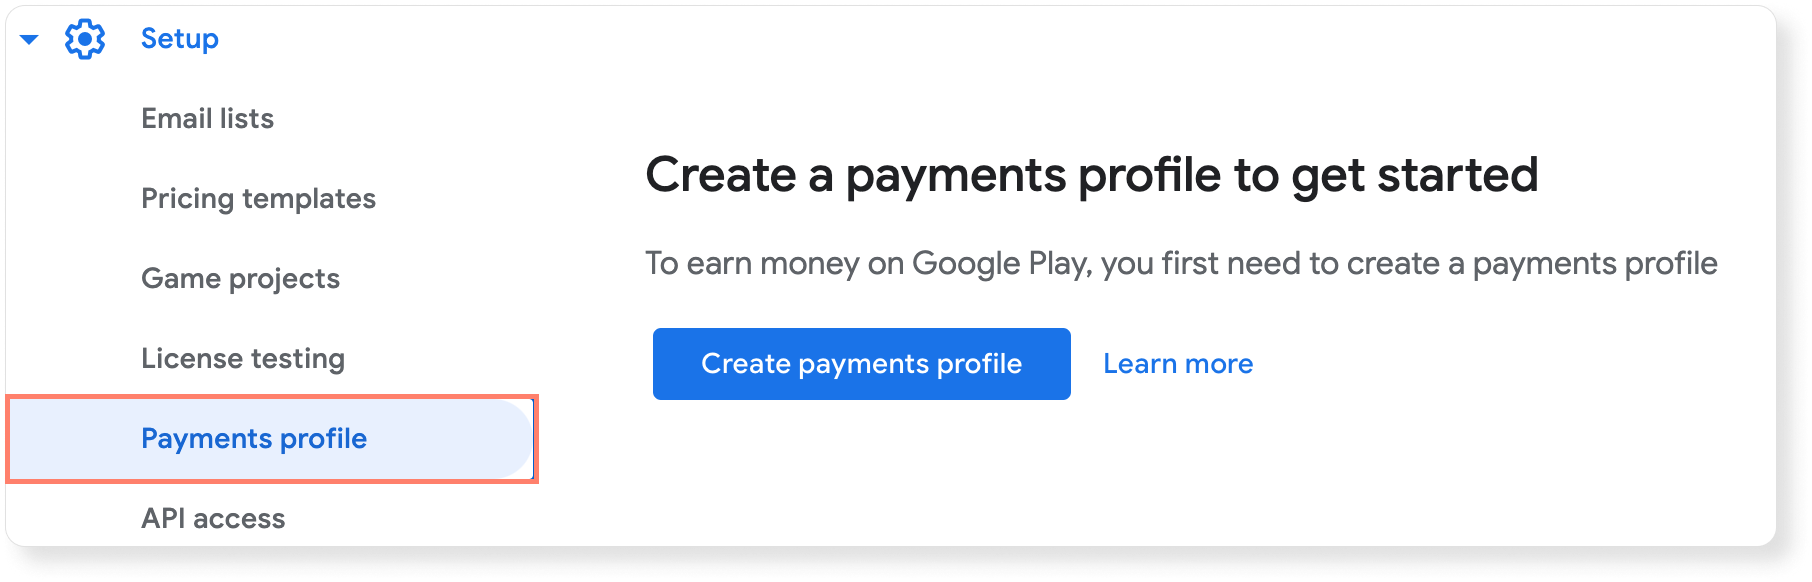
After that, you will have the opportunity to manage your monthly payouts and analyze sales reports. Once you create your Merchant Account, your developer account in Google Play Console will automatically be linked to it.
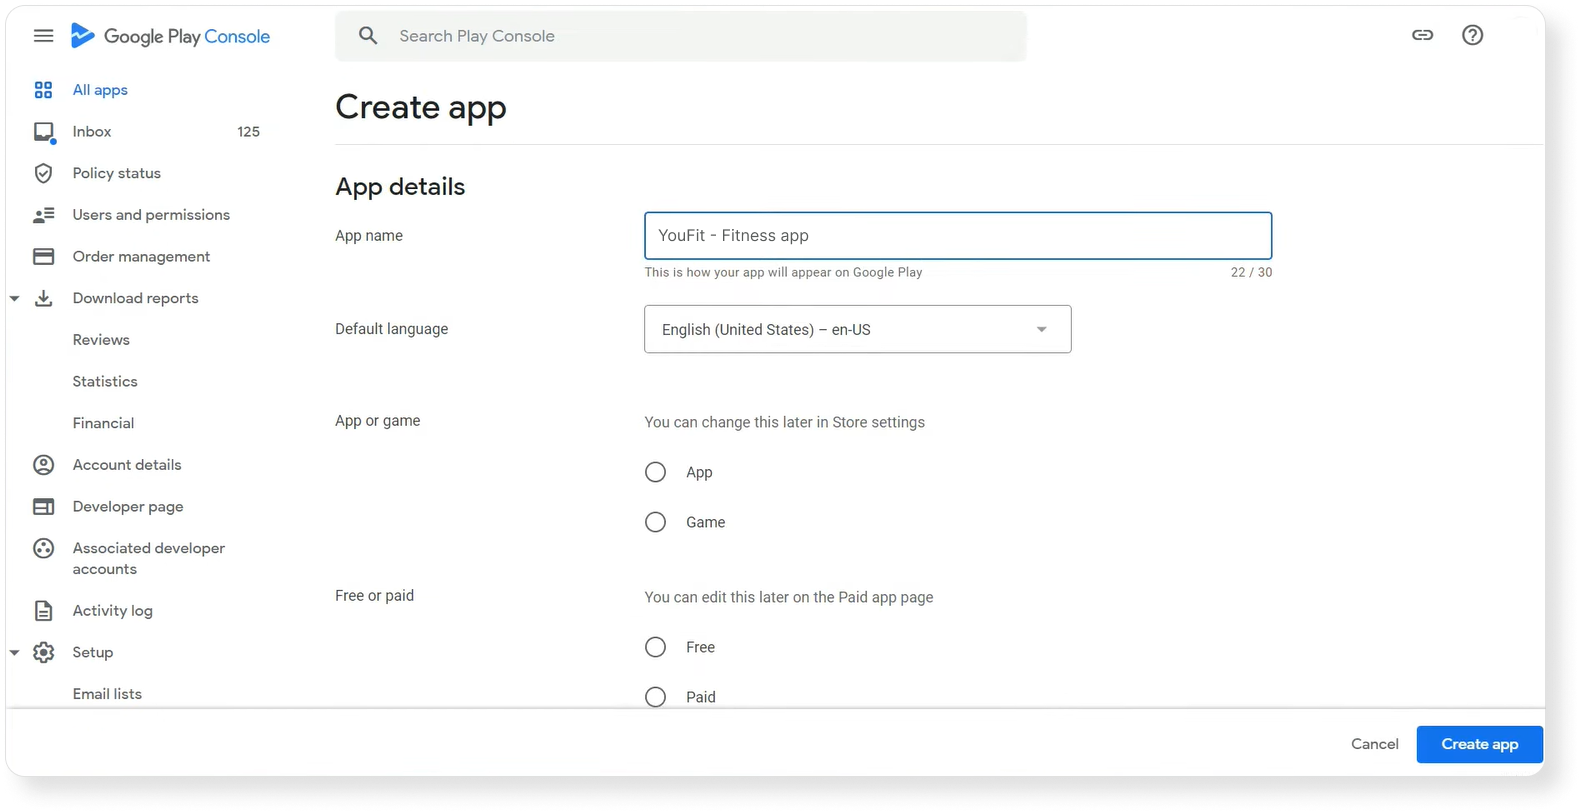
3. Create your app
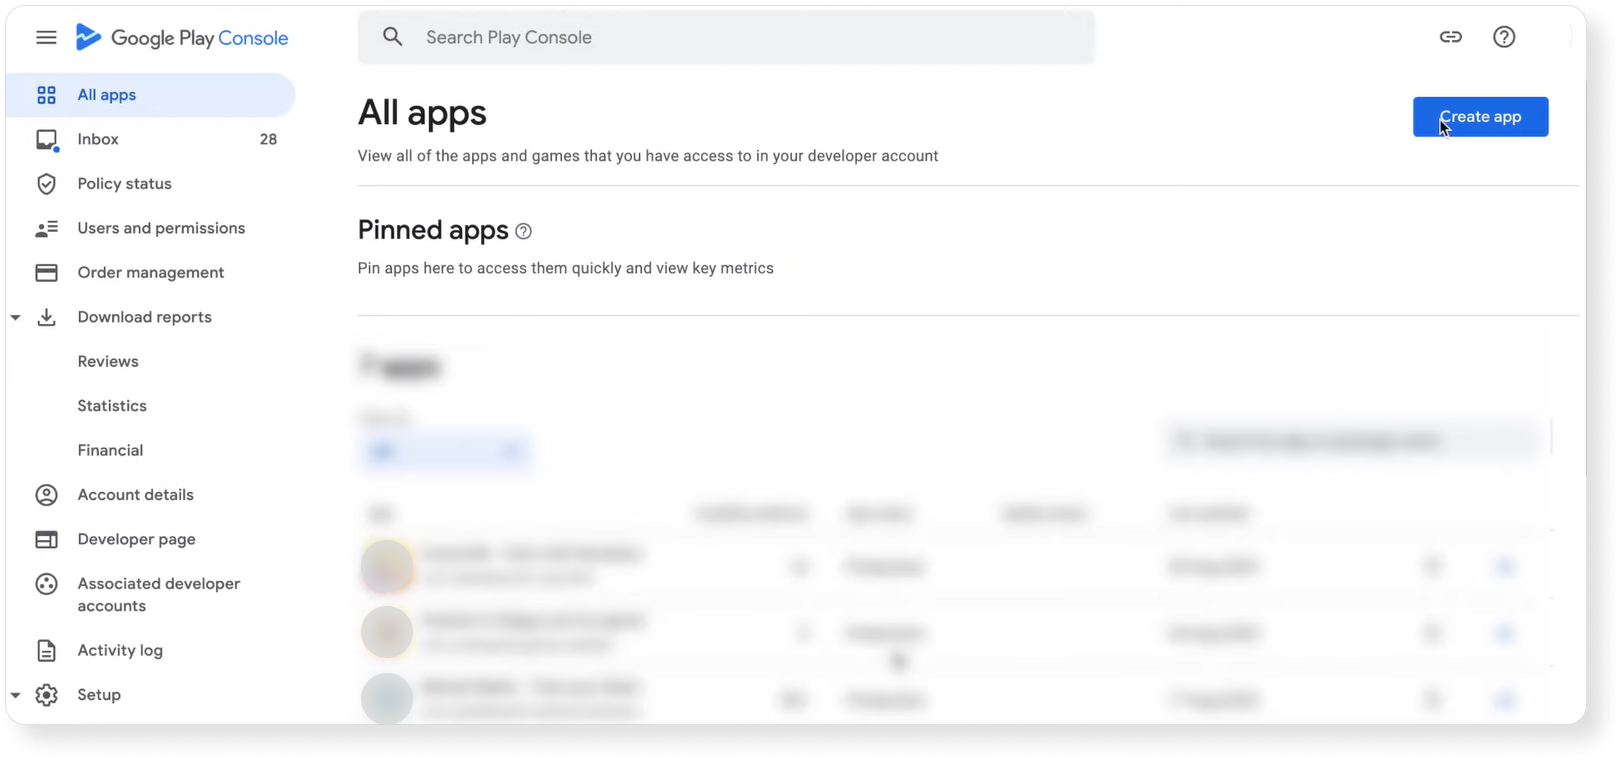
After you create your account, Google will redirect you to Play Console so that you can start creating your app. To do this, you need to:
1. Open the “All apps” tab.
2. Select “Create app”.
3. Choose the “Default language” of your app and enter your app title. You can change this information later.
4. Select:
- whether you want to create an app or game. You can also change it later.
- whether you want to make the app free or paid.
- select the app category from the list.
- your email address which users can use to contact you.
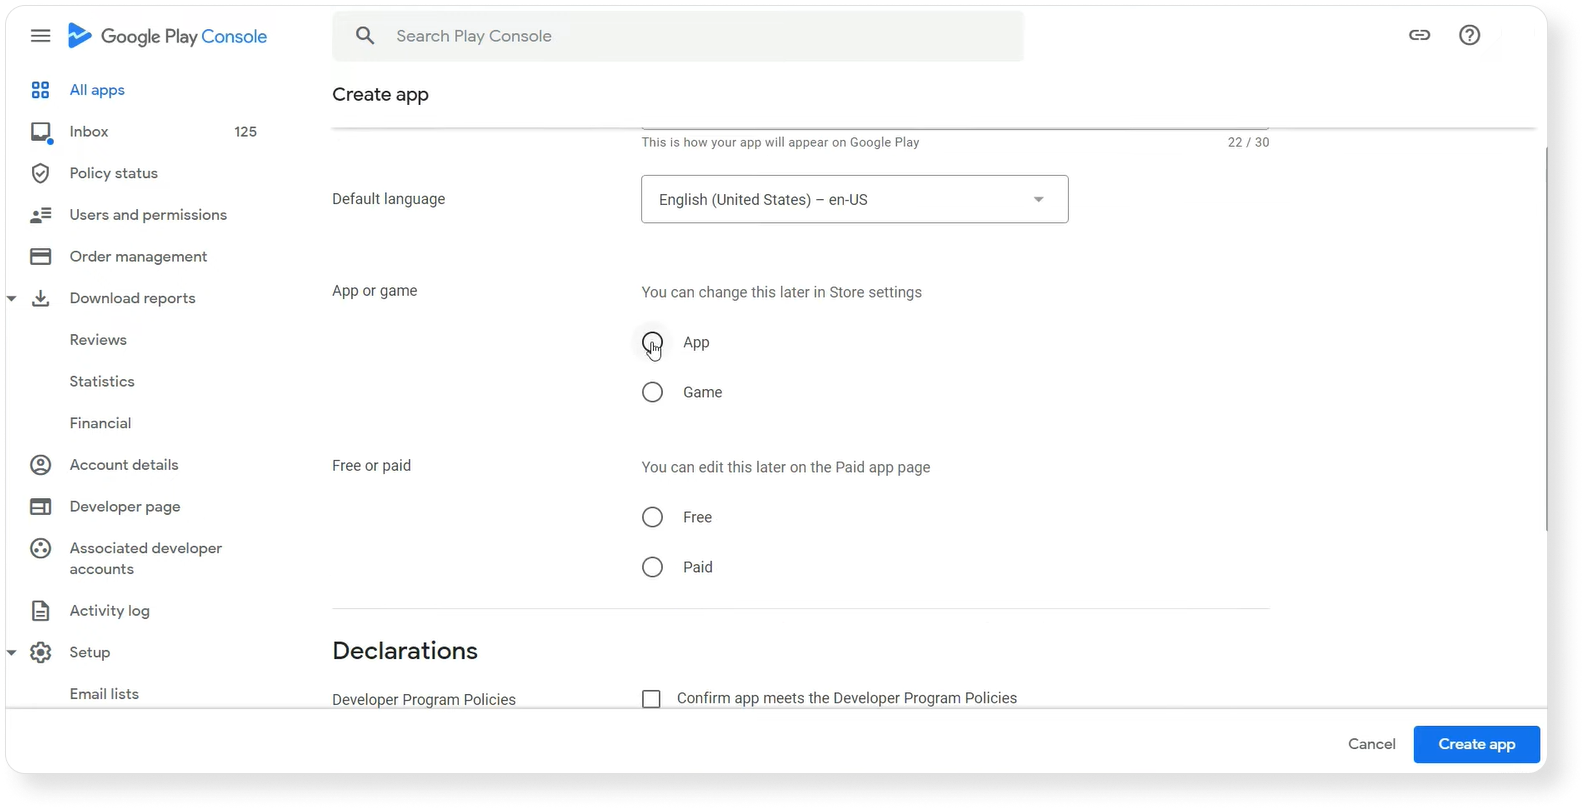
4. Move to the “Declarations” section. Indicate your agreement with both the “Developer Program Policies” and “US export laws”.
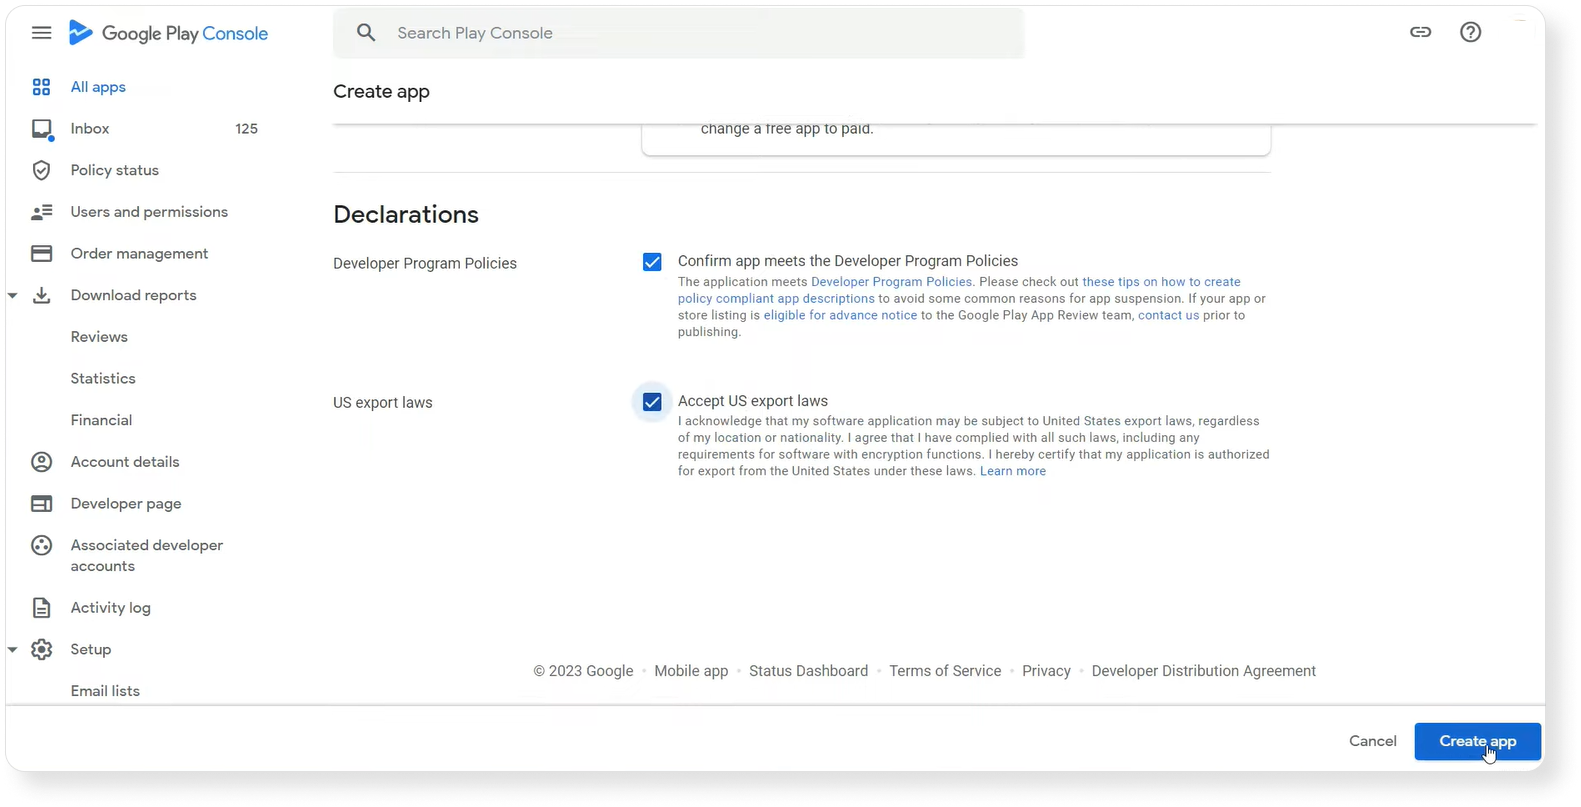
After completing these steps, click on the button “Create app”.
4. Set up your app
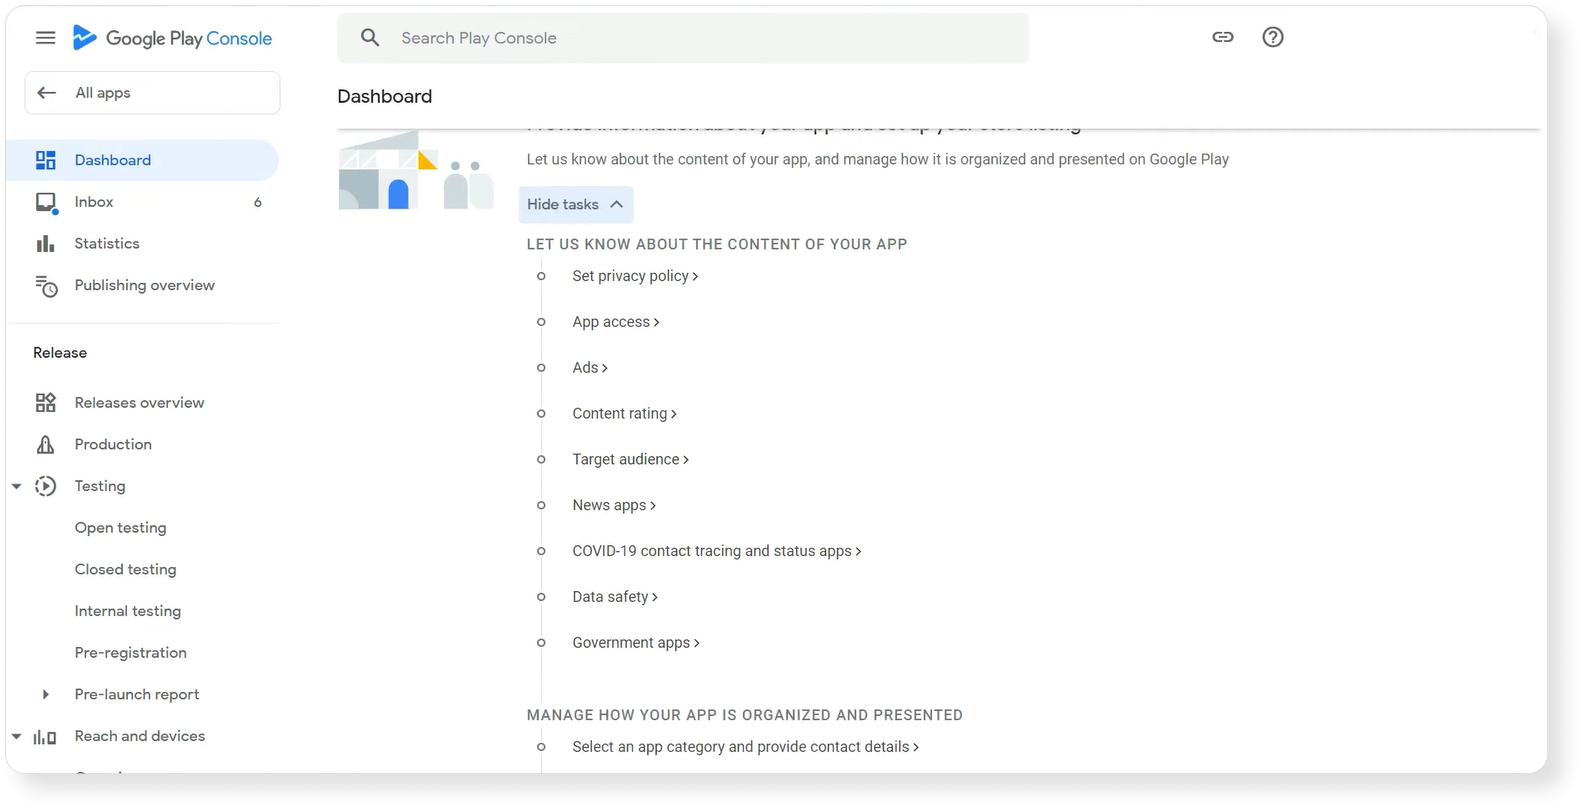
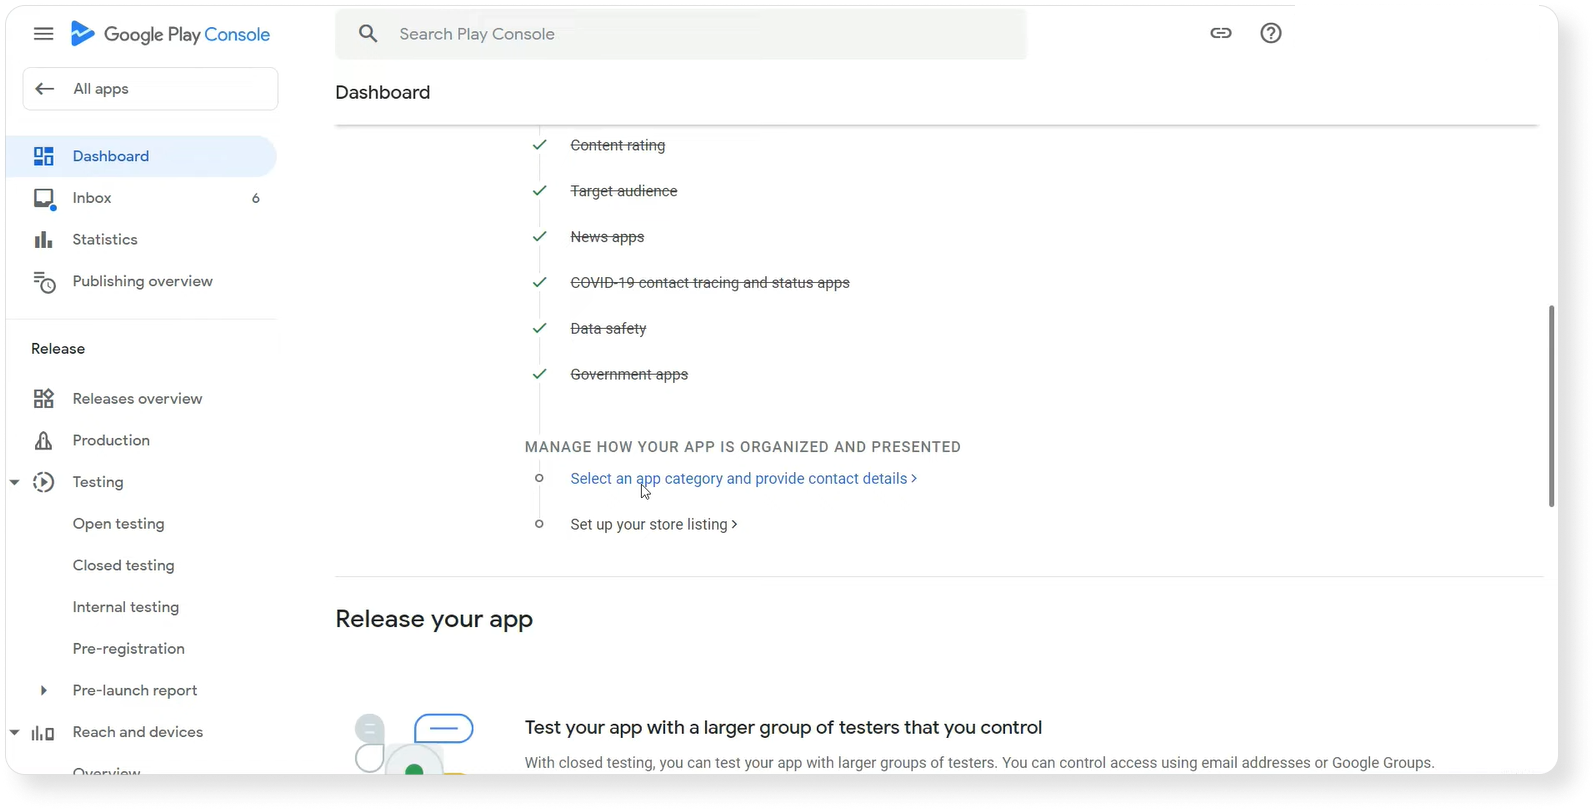
After tapping the “Create app” button, Google Play Console will redirect you to the Dashboard, where you need to set up your app.
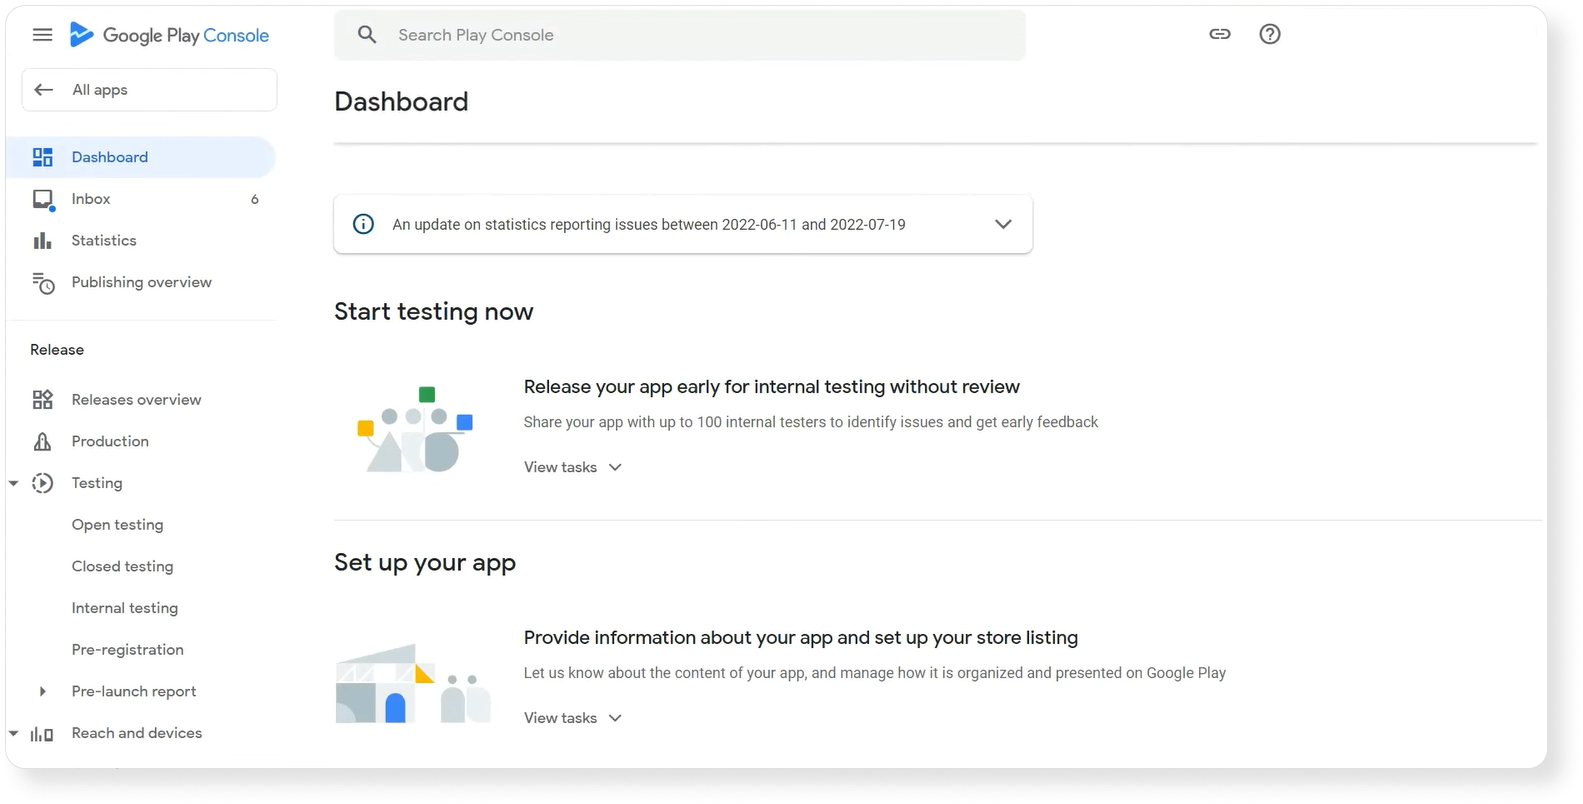
In the “Set up your app” section, Google will show you various steps that you need to complete to publish your app on the Play Store. In this section, Google will ask you some questions about your app to assess its safety and guide you on the appropriate review process.
Privacy policy
The privacy policy, in conjunction with any in-app notifications, should provide a thorough account of how your app gathers, utilizes, and disseminates user data, encompassing details about the parties it is shared with.
You can include a link to it on your website or within Google Docs.
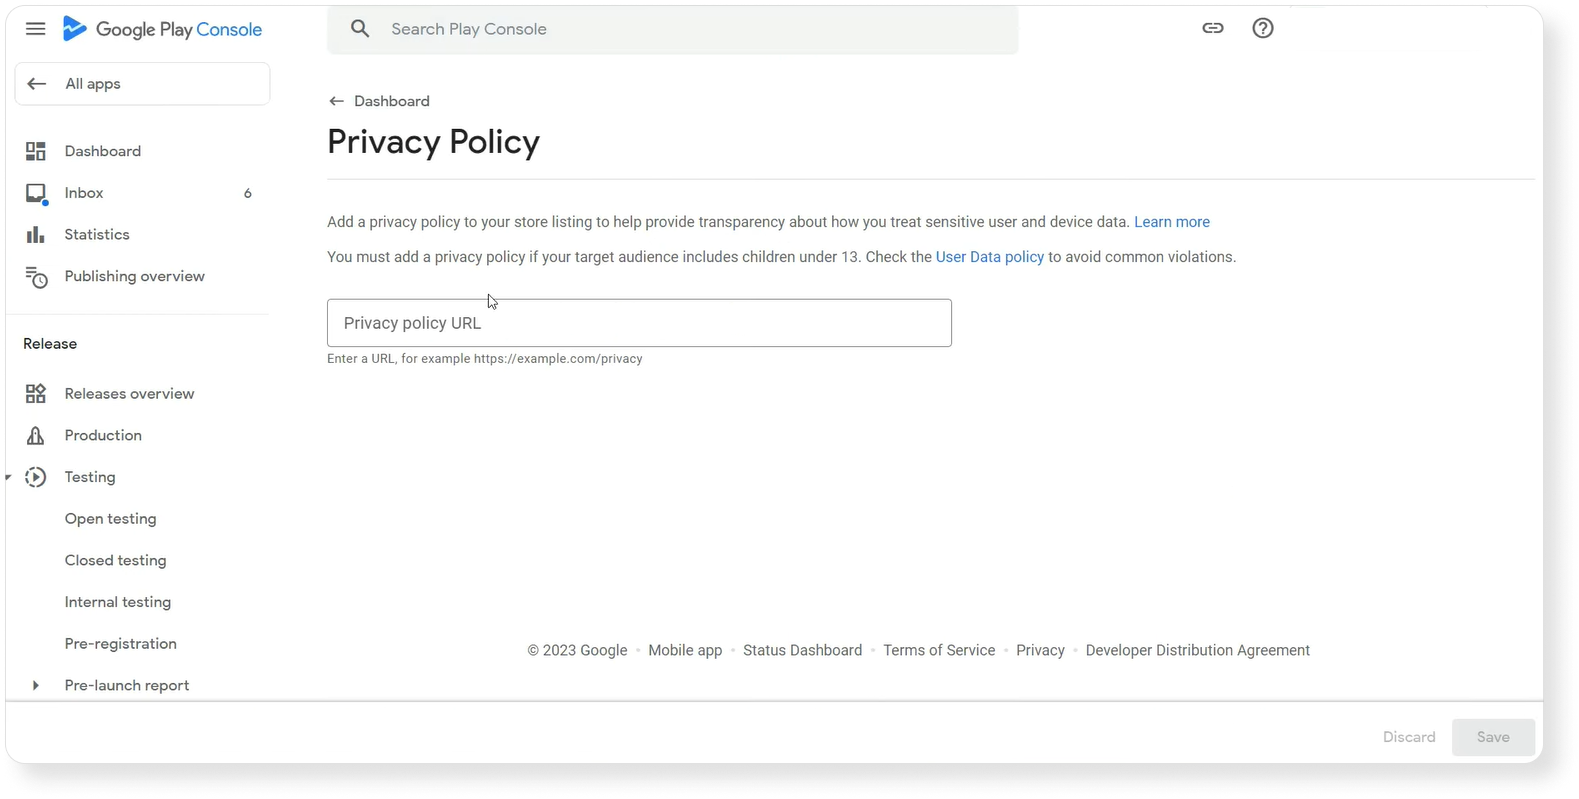
This Privacy Policy should offer comprehensive insights into how your app interacts with user data, covering access, collection, usage, and sharing. The information disclosed should go beyond what’s mentioned in the Data Safety section. To write an appropriate Privacy Policy, follow these instructions:
- Include developer information and provide a point of contact for privacy-related inquiries.
- Clearly state the types of personal and sensitive user data your app accesses, collects, uses, and shares, including any third-parties involved.
- Describe the security measures in place for handling personal and sensitive user data securely.
- Outline your policy regarding data retention and deletion.
- Ensure that the privacy policy is explicitly labeled, typically listed as “Privacy Policy” in the title.
A Privacy Policy is especially important for children apps. For example, we once included the sentence “Anyone can handle the controls, even a child” to a fishing game. The app was immediately removed from Google because the privacy policy did not mention children, and the app’s category did not align with children’s app content.
The creator, whether it’s the developer or a company, as stated in the Google Play Store listing of the app, should be explicitly referenced within the privacy policy. Alternatively, the app itself should be mentioned in the privacy policy.
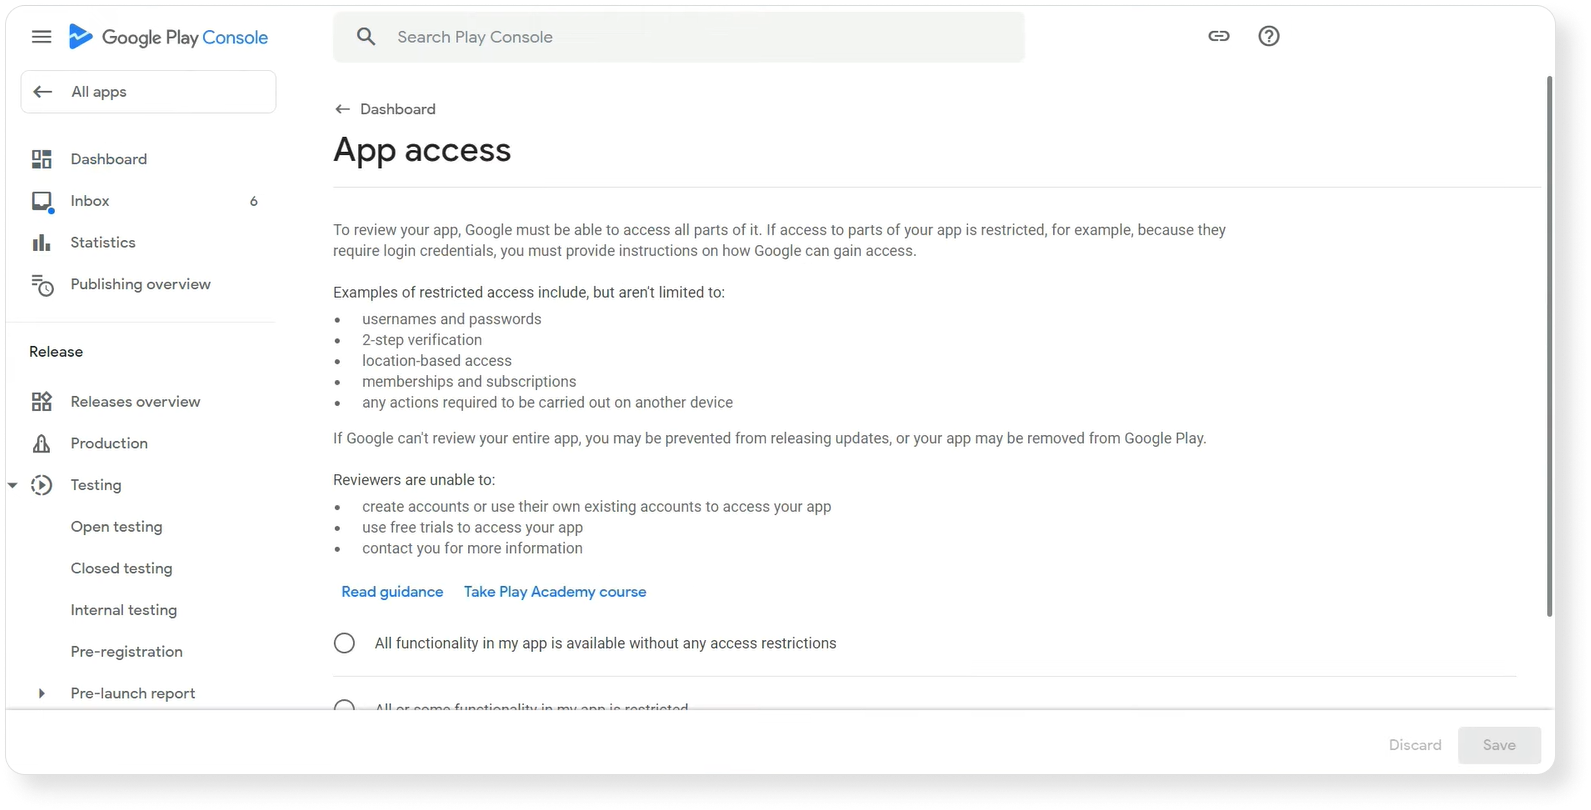
App access
At this point, you need to give Google access to your app so that the company can review all of its elements.
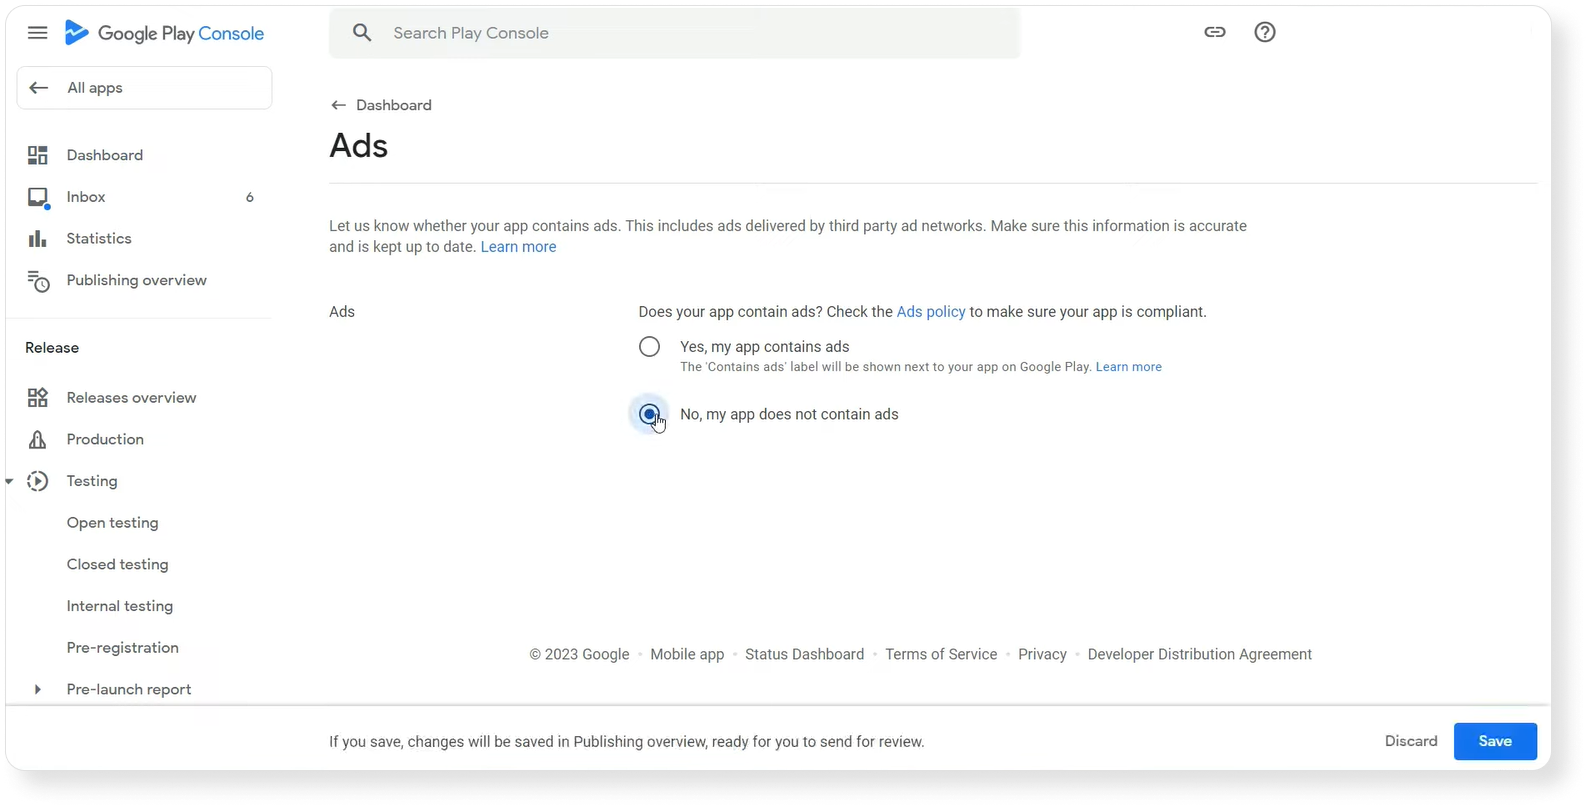
Ads
Here you need to indicate whether your app contains ads or not. This also includes ads delivered by third-party ad networks.
Content ratings
Now, you need to select the age group for which your app is designed. It is very important to do so as if you don’t rate your app content, Google can label your app as “Not rated,” and it can be removed from Google Play.
In this section of the Dashboard, you need to fill out a questionnaire to receive an official content rating for your app from Google Play.
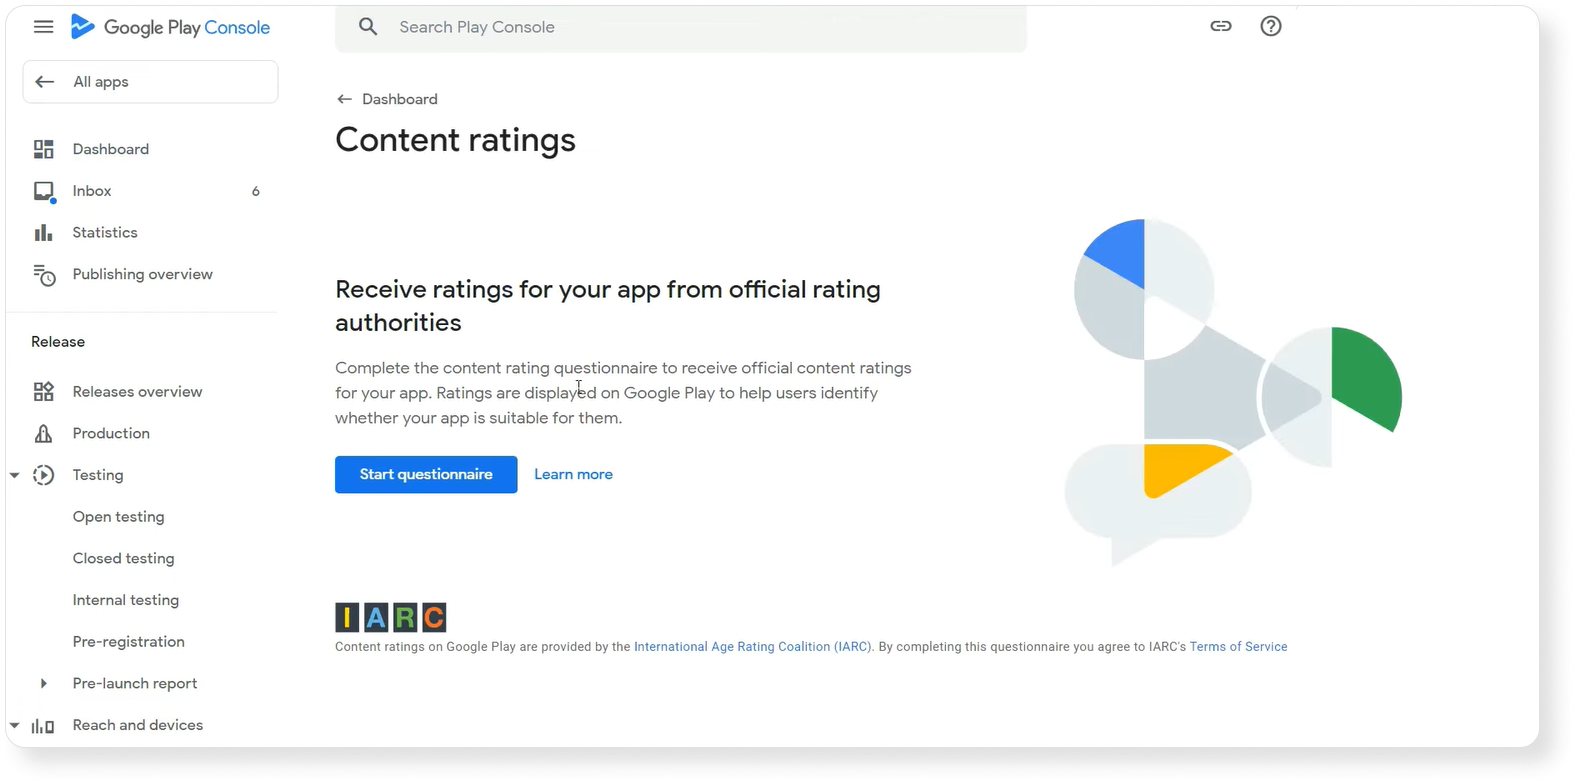
Google will give your app content ratings immediately after filling out the form. Your app rating will be displayed on Google Play on your app page above the install button and in the search results on branded search queries.
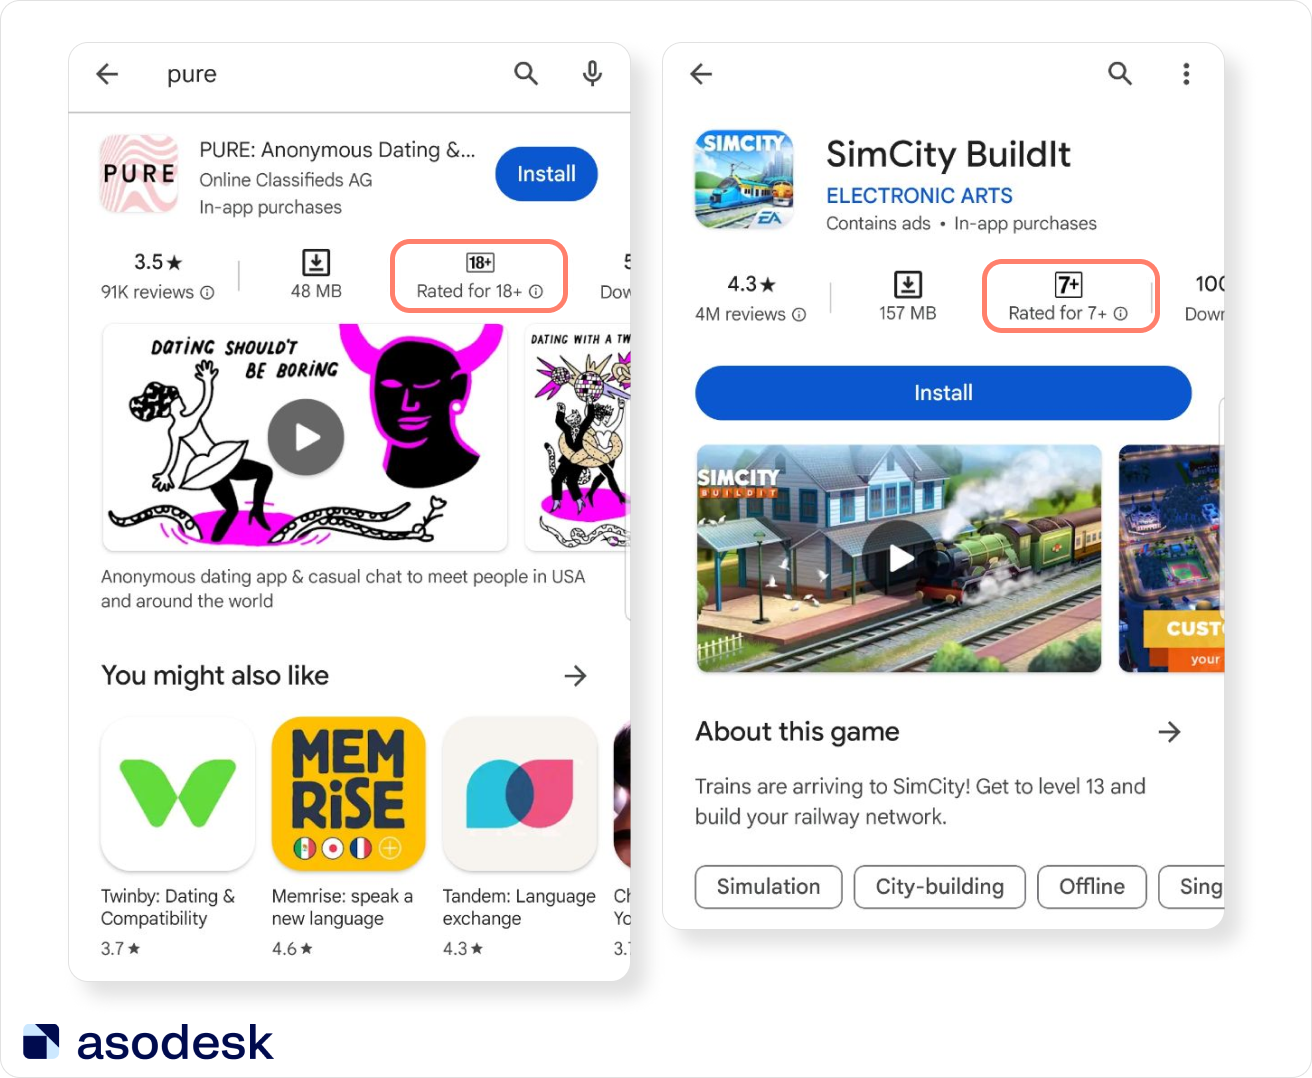
Note: branded search queries include the names of companies and brands (such as Pure), while non-branded queries can reflect the functions of different apps (such as “dating” or “social media”).
It is important to provide accurate app ratings to reach the right audience on the Play Store.
Target audience and content
Here you need to choose an age group of your target audience. In this section, Google will also give you guidance on what to do if your app is targeted at children. If you choose an age group under 13, you need to submit a Family Policy document.
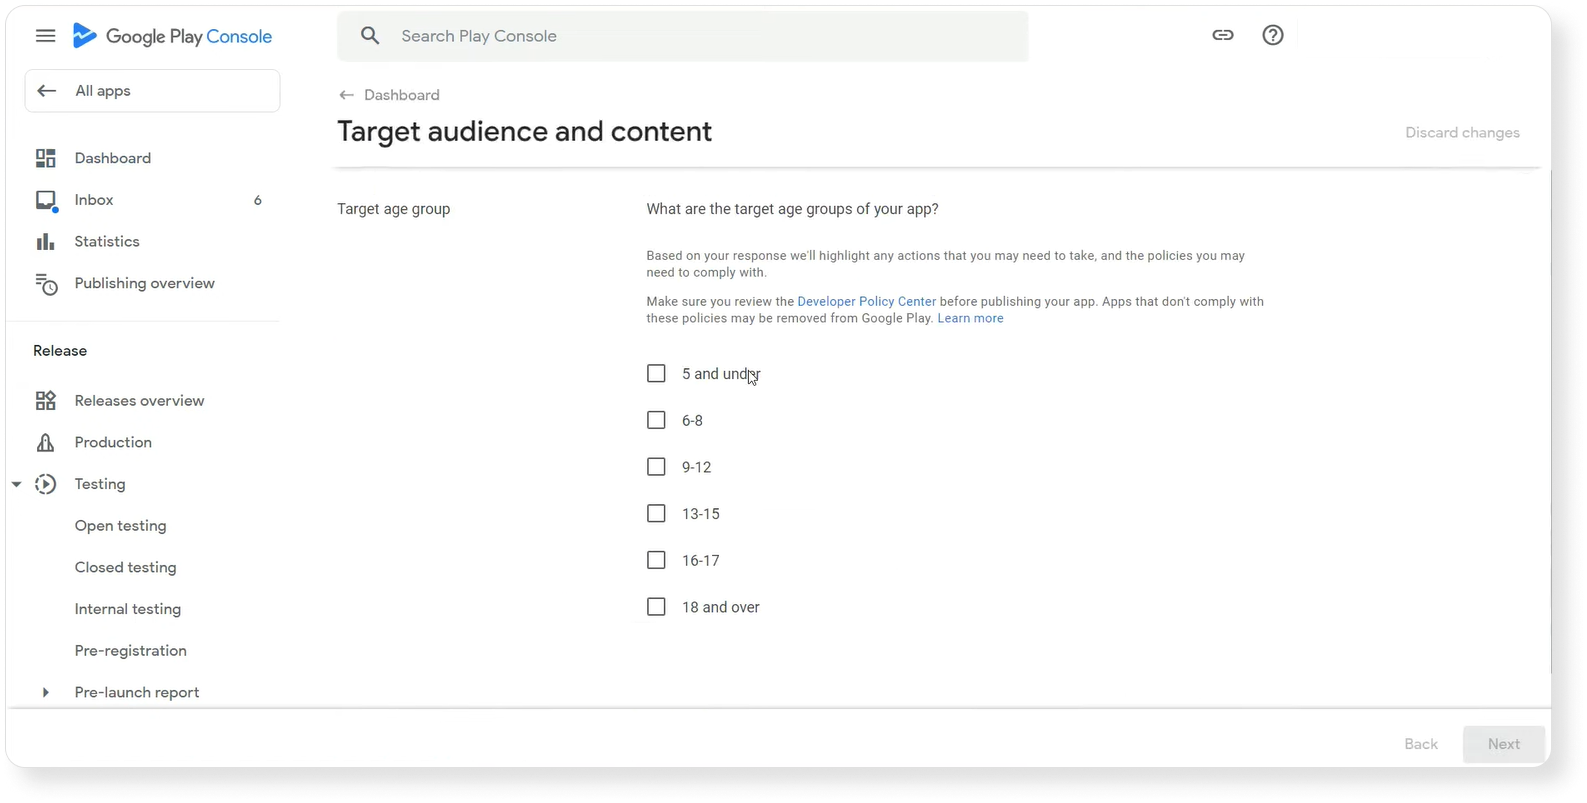
If you select a target audience above 13, Google will ask whether your app unintentionally appeals to children.

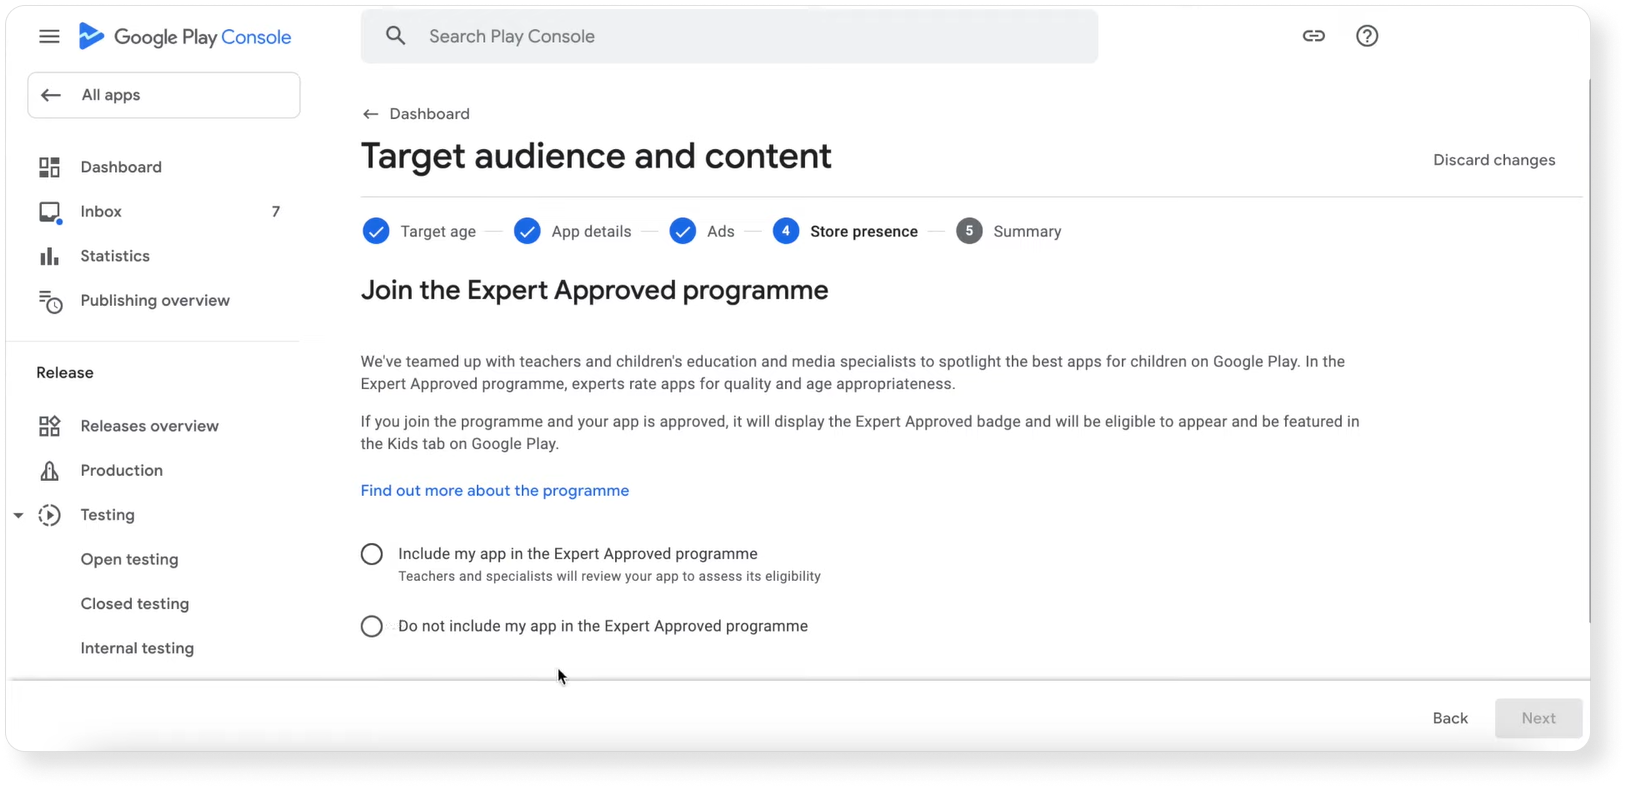
If your app is educational, Google can include it in an Expert-approved program. In this case, the special badge will appear on your app page and will be featured in the Kids tab.
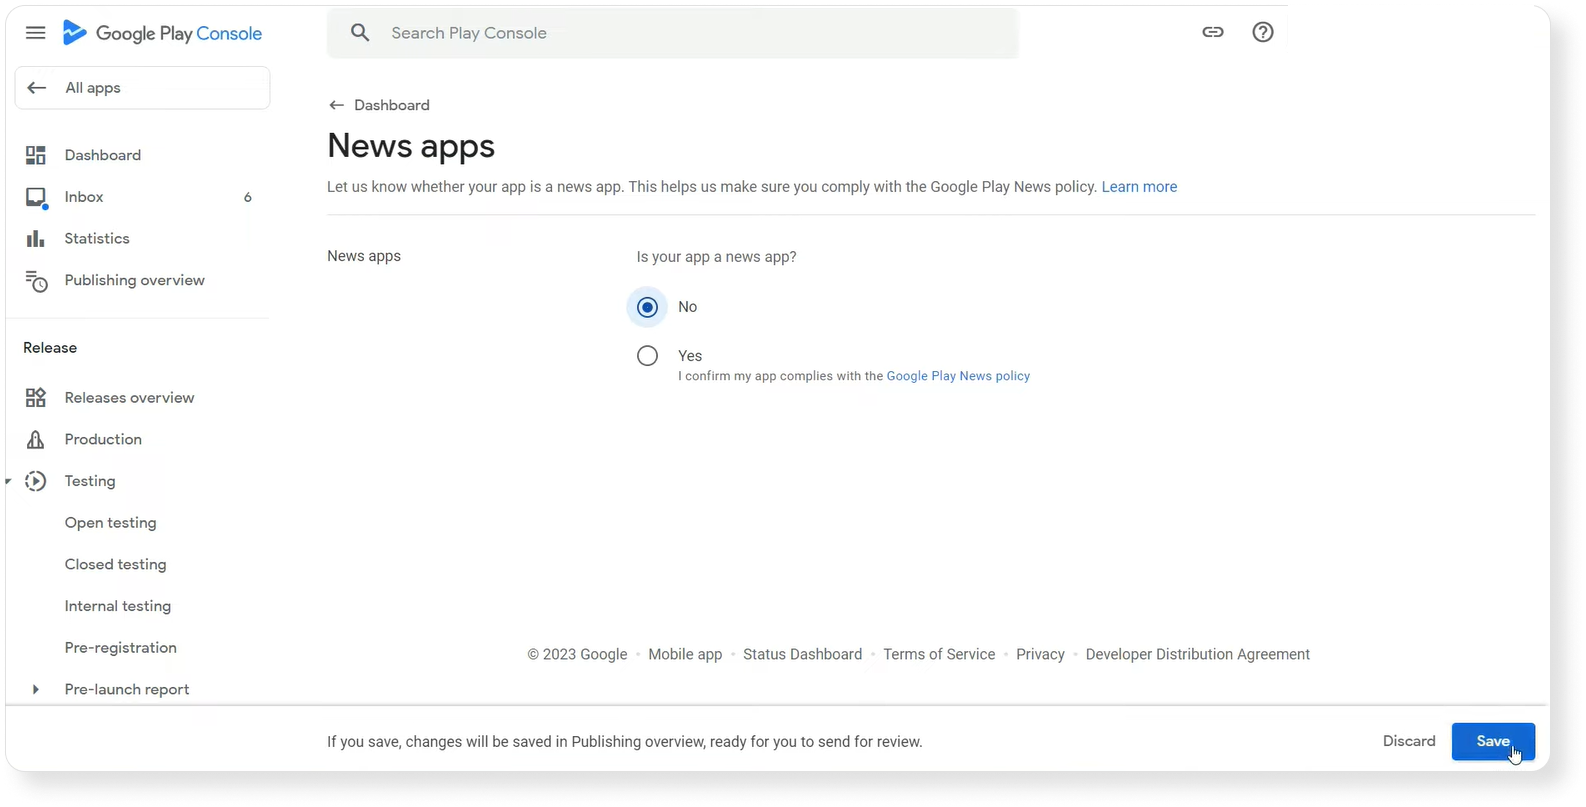
News apps
You need to choose whether your app is news or not. If your app is related to the news category, it should comply with Policies for news apps.
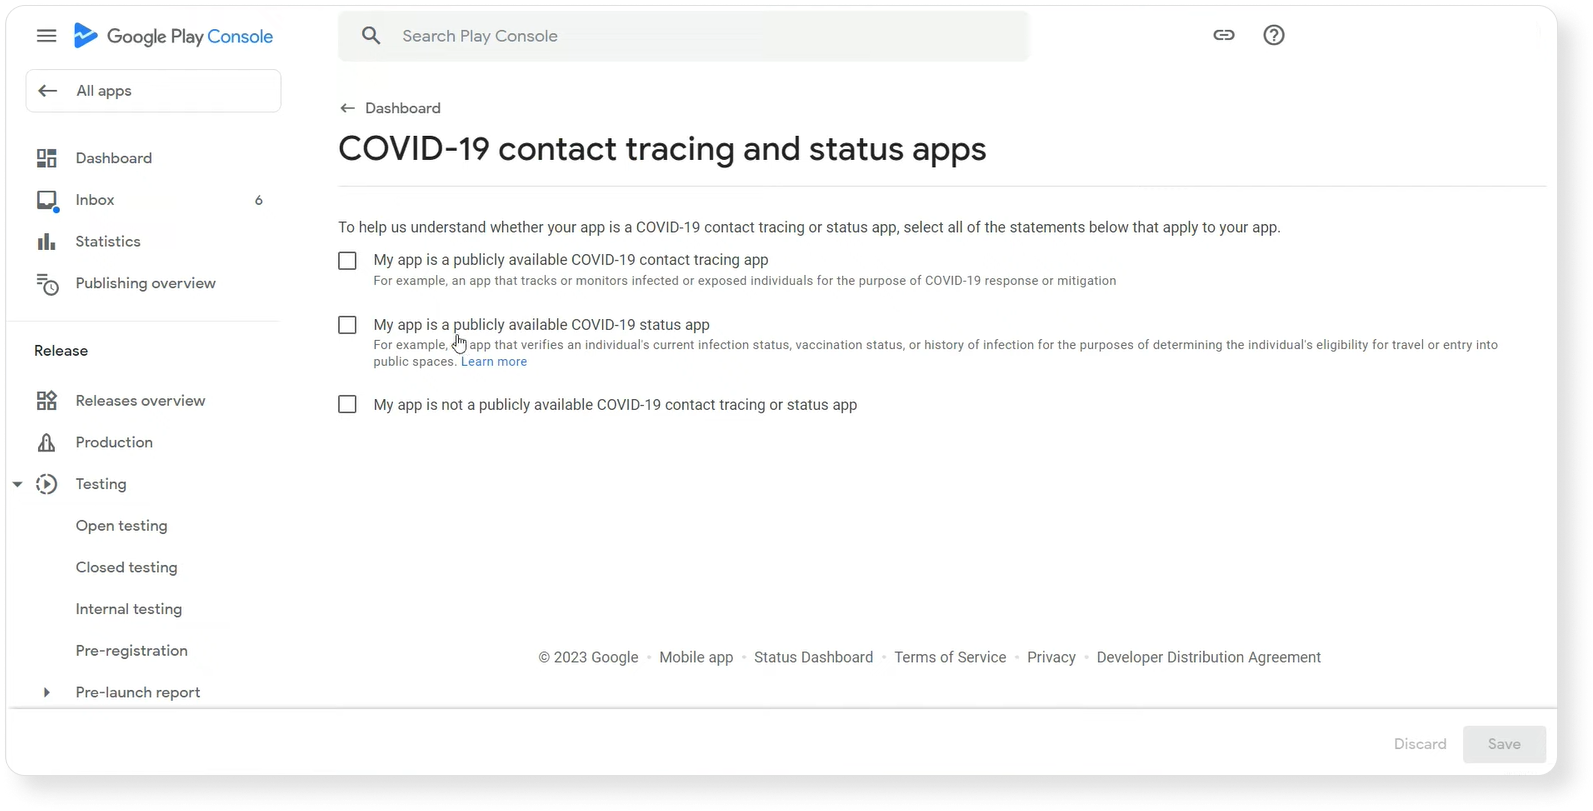
COVID-19 contact tracing and status apps
In this section, Google inquires whether your app involves tracking COVID-19 data. COVID-related apps can only be released by certified national institutions. If your app doesn’t fall into this category, simply choose the last option in the screenshot.
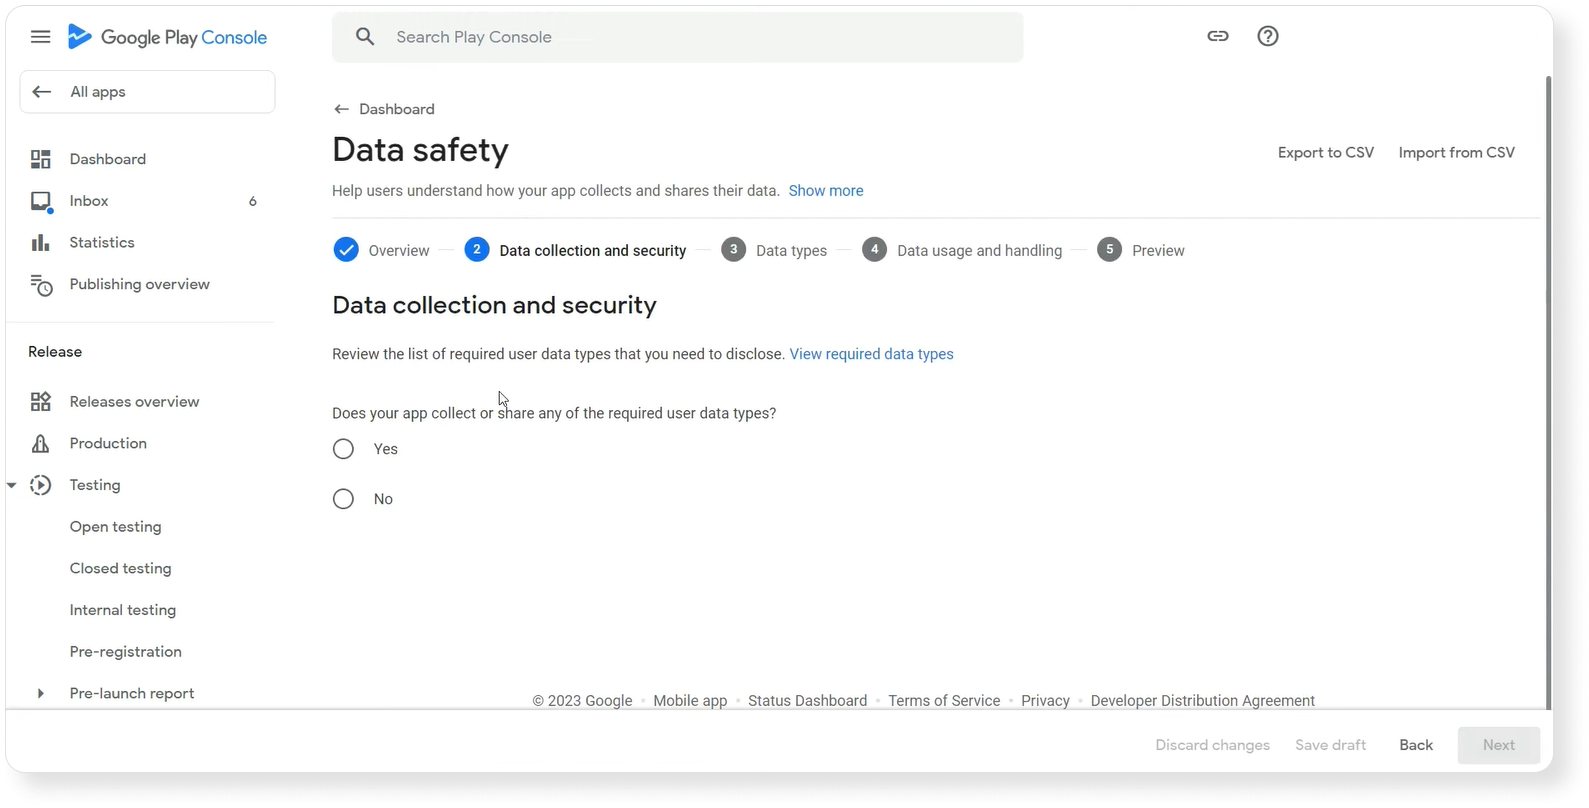
Data Safety
Here you should fill out the form to give Google information on how your app saves and collects user data.
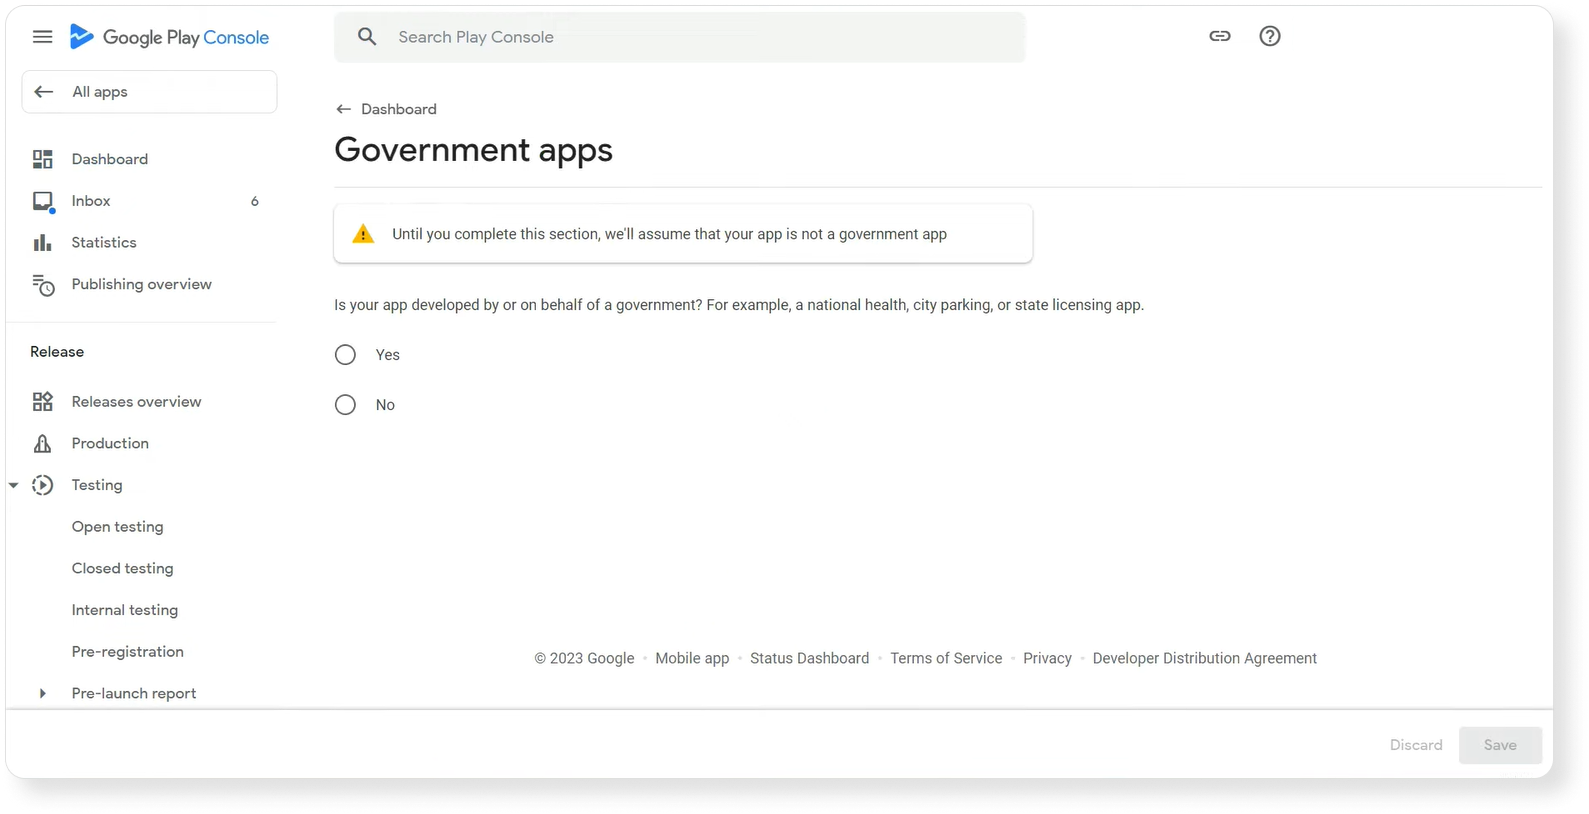
Government app
Google asks you to indicate whether your app is developed by or on behalf of the government.
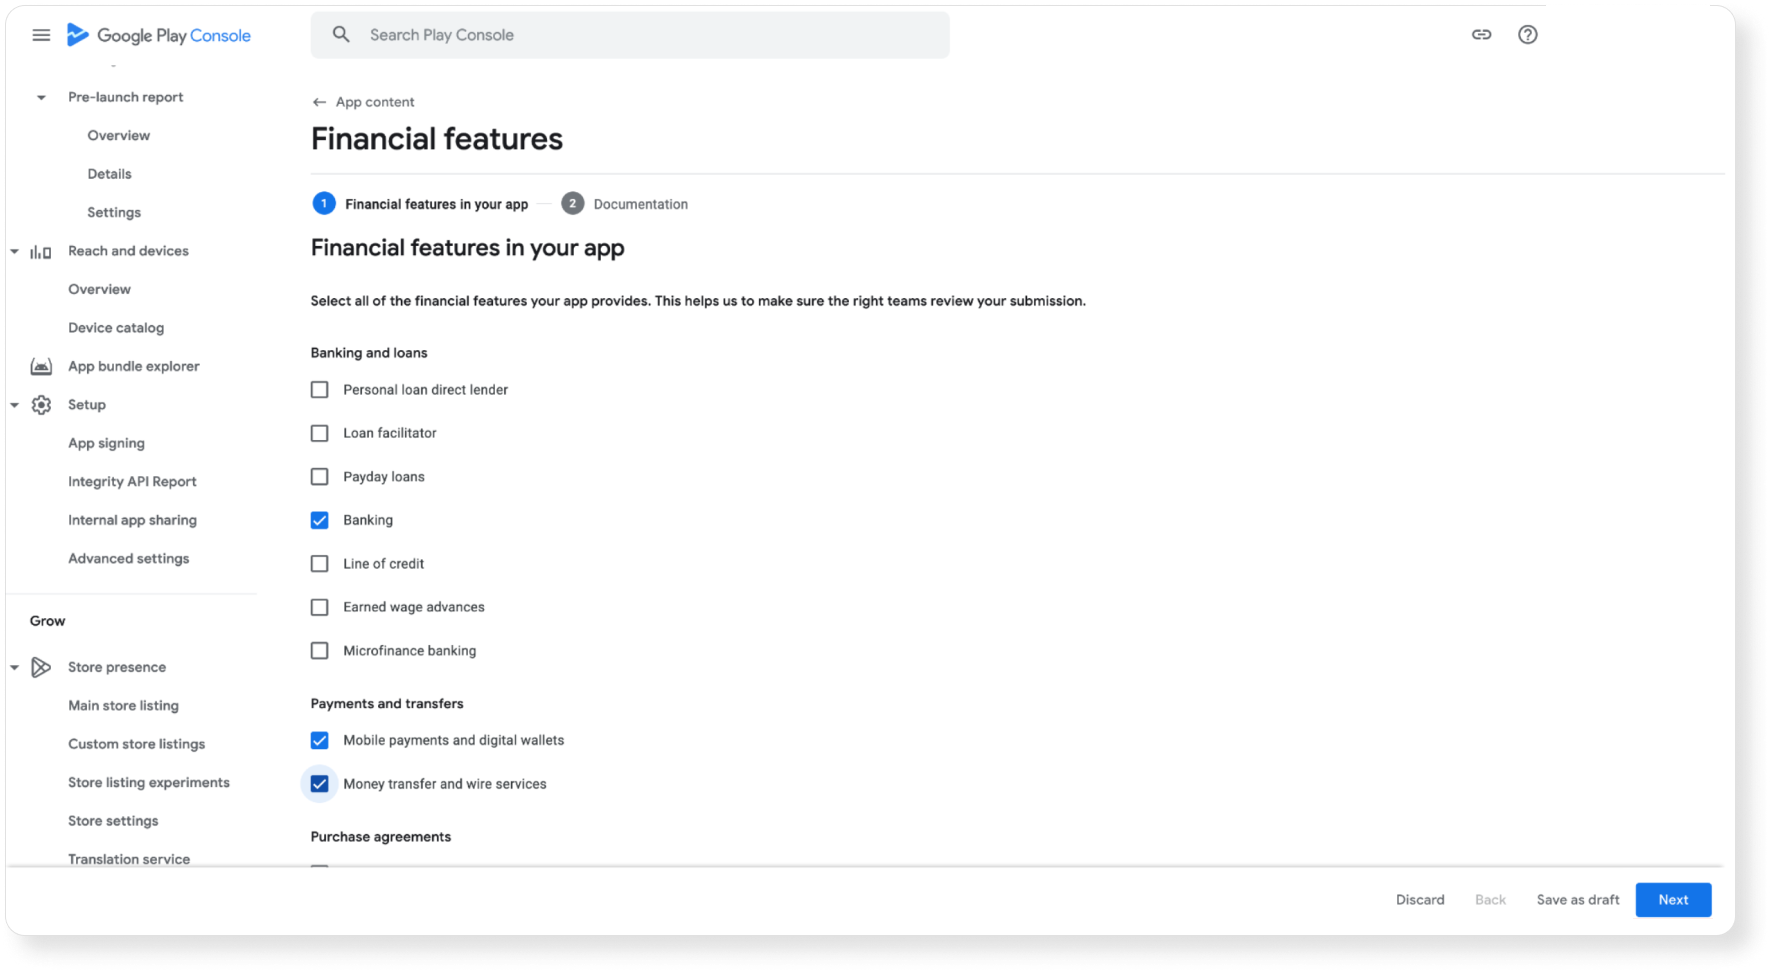
Financial features
In this section, you need to specify whether your app offers any financial functionalities. Learn more on how to provide a Financial features declaration.
Then you should move on to the remaining steps outlined by Google Play.
5. Choose a category, add the right tags, and fill in contact details
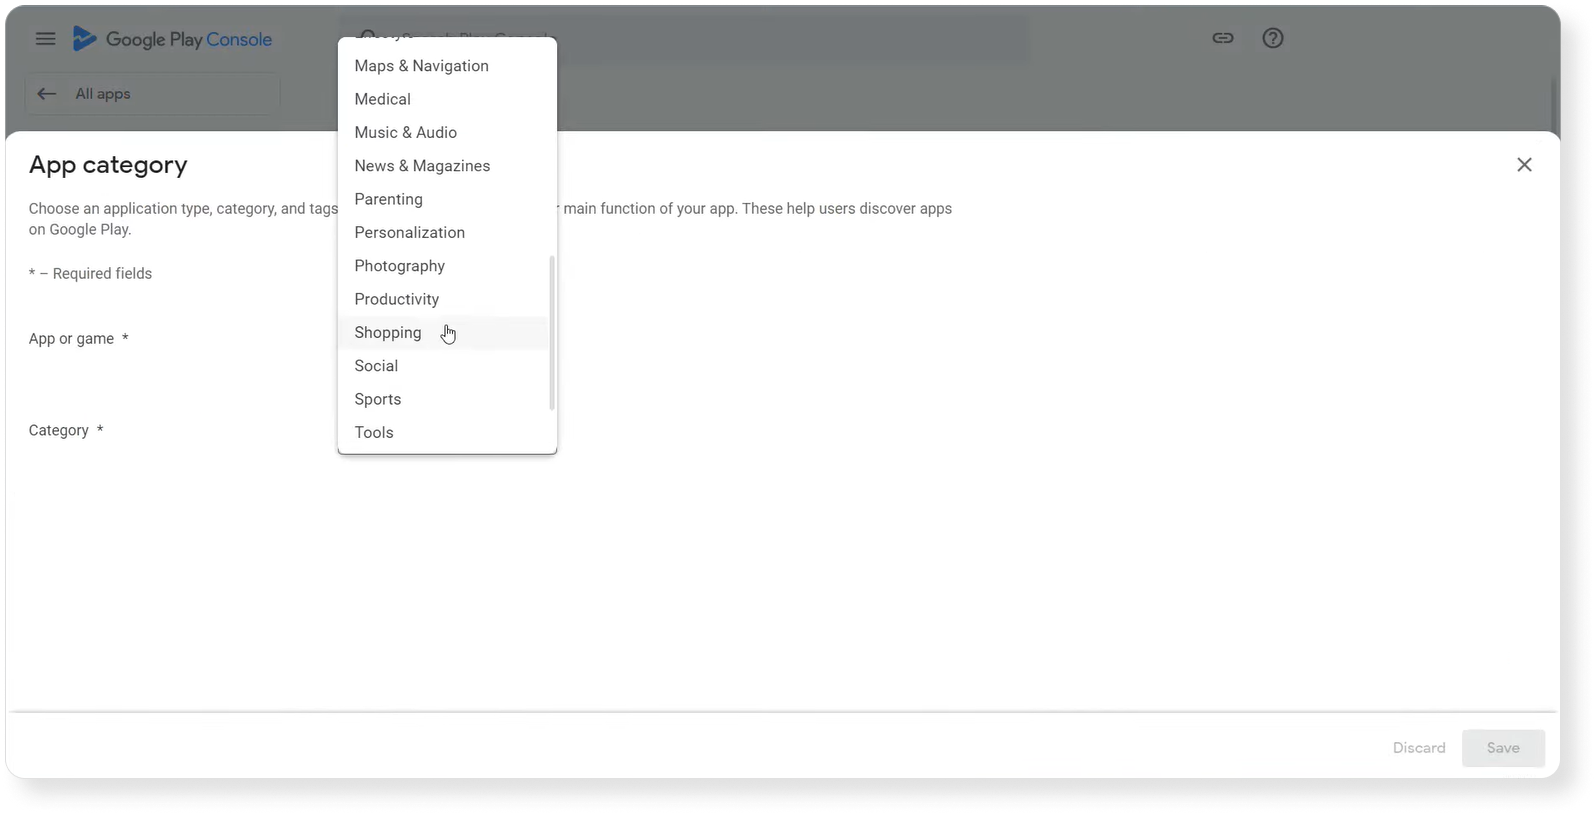
After filling in the sections above, Google needs to manage how your app is organized and presented. At this stage you need to select an app category and provide contact details in the Dashboard.
You can choose a category for your app or game from the listed categories in Play Console Help.
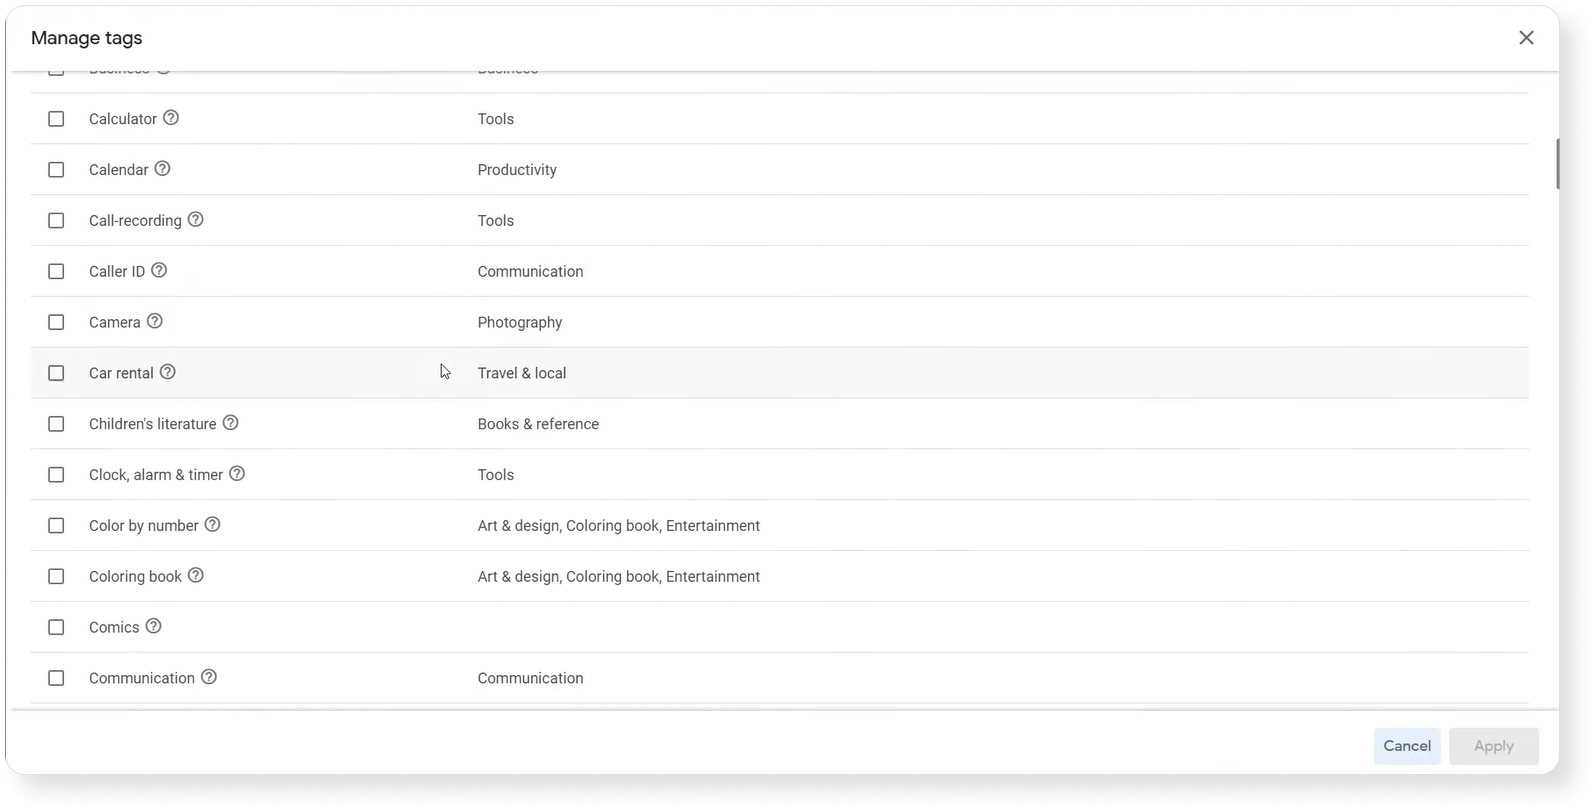
Google will then ask you to select tags from the list. With tags you can describe what users can do with your app or game.
Read how to choose an app category and tags in Google Play’s instructions.
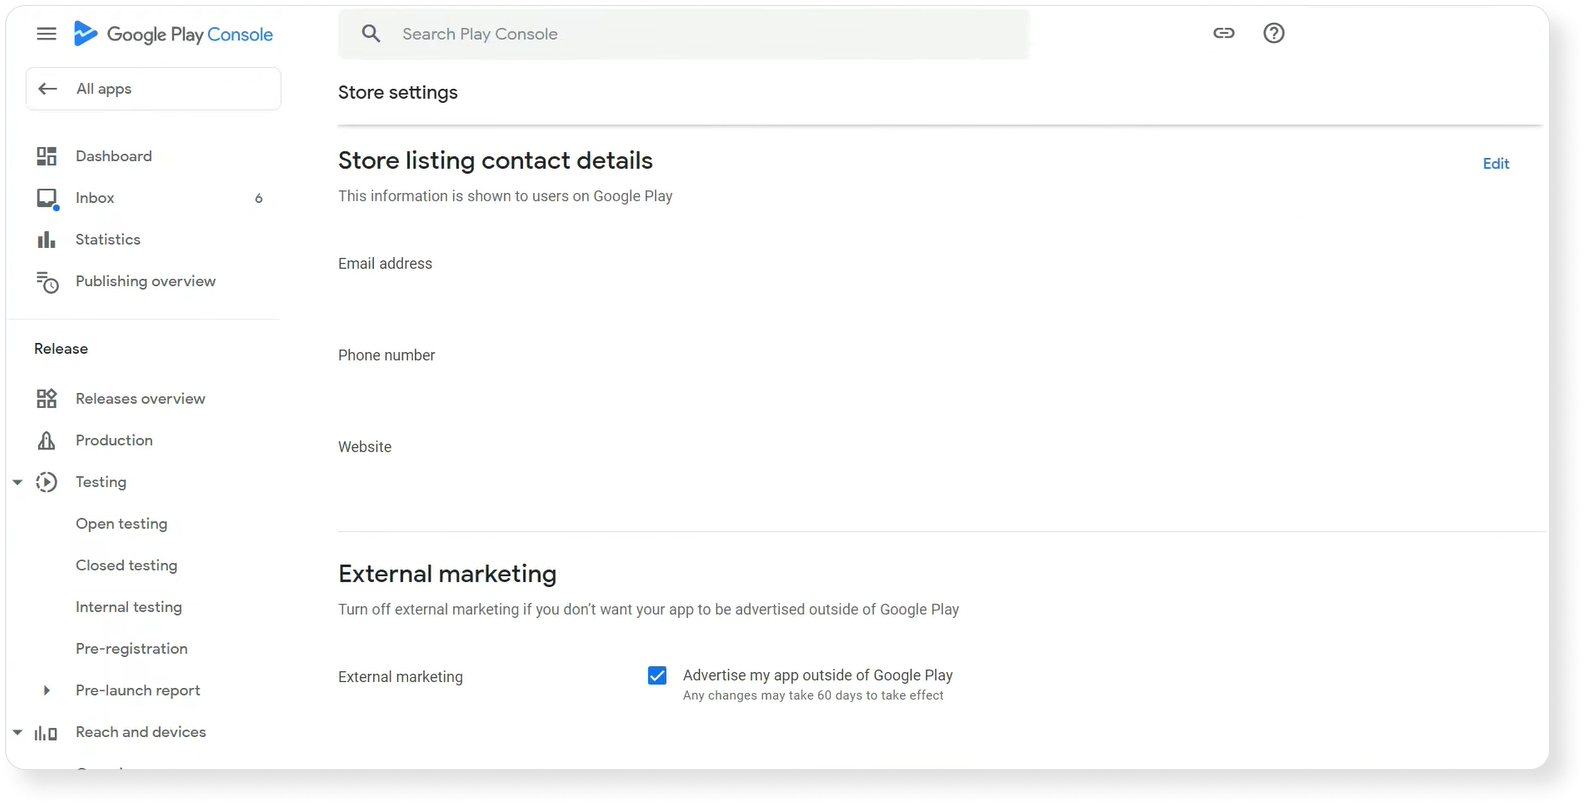
In the Play Store’s settings, Google also requires app developers to add their contact details to make it easier for app users to write to you. Here you must provide your email. You can also add a phone number and a link to a website if you wish.
After filling out these fields, you need to set up your store listings.
6. Use App Store Optimization to create the best store listings
Before publishing your android app, Google will prompt you to create store listings for your app. Store listings encompass textual and visual metadata fields that appear on your app’s page and are visible when users browse or search on Google Play.
Textual metadata includes:
1. App name
2. Short description
3. Full description
These metadata fields are indexed by the Google Play algorithm. Therefore, including important search queries here will improve your app’s ranking in the search results.
We recommend using App Store Optimization practices to create the best store listings for your app. App Store Optimization (ASO) is the process of optimizing mobile apps to enhance their visibility in the App Store and Google Play Search, as well as improving conversion to install rate from various traffic sources.
With ASO, you can:
- Discover the most effective keywords to increase your app’s traffic.
- Prepare effective app metadata to enhance your visibility and app conversion rate.
- Analyze your competitors and learn how to stand out from them in Google Play Search.
- Evaluate the effectiveness of your ASO efforts and learn how to improve your ranking and conversion.
To solve these tasks, you’ll need to use ASO tools that can assist you at every step of App Store Optimization. Start by identifying the best keywords for your app and adding them to your semantic core.
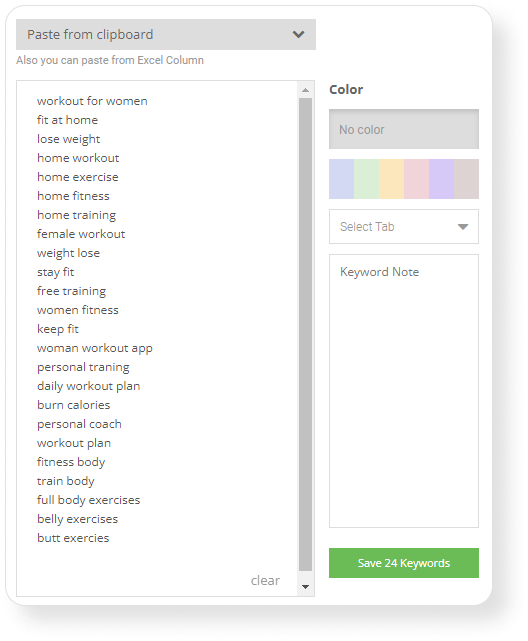
1. First of all, jot down keywords that you associate with your app. You can save them to your semantic core immediately with Asodesk.
2. Next, review ASO suggestions and select the relevant ones:
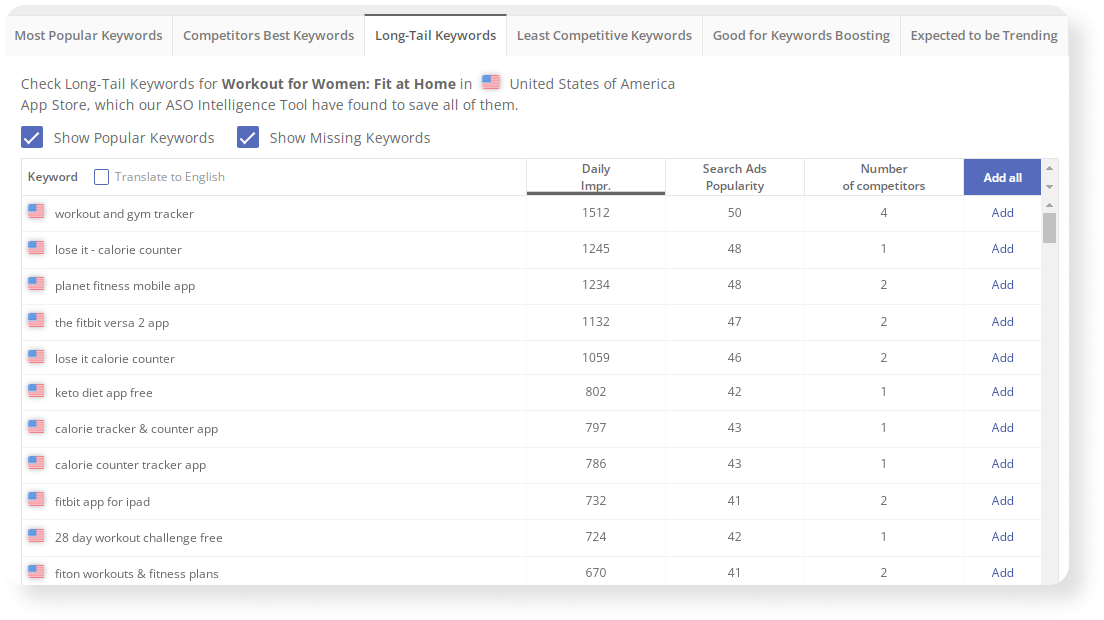
For example, Long-Tail Keywords are especially relevant in ASO for apps that have just entered the market. They won’t bring in a large amount of traffic, but they will provide a starting point for the app to later achieve better rankings. When you publish a new app, it will be difficult to achieve good visibility for popular keywords. An app may reach 100–200 in the rankings. Therefore, in order to make it to the top of search results where users download most apps, it is necessary to use less popular keywords or long-tail keywords at first.
3. Include Google Play search suggestions. Google displays these suggestions to users beneath the search bar when they start typing a query. These suggestions are frequently utilized by Google Play users, making it essential to incorporate them into your semantic core.
4. Incorporate keywords from your competitors. Analyzing competitors can help you discover many new keywords for your app. The first step is to identify your competitors.
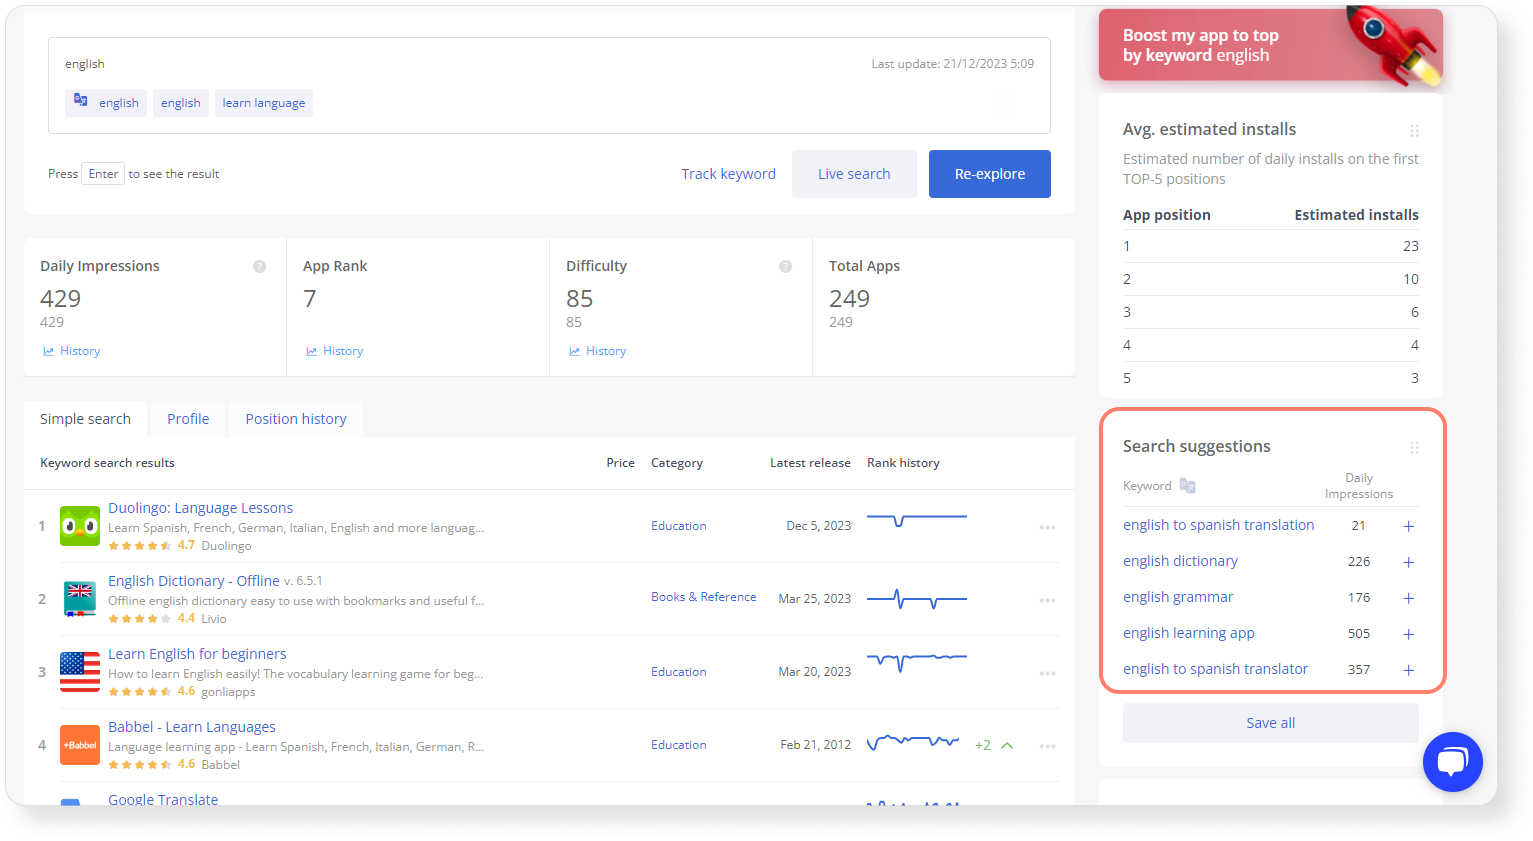
Use the Live Position tool to search for queries related to your app and observe which other apps are ranking for these queries. Then add these apps to your list of competitors.
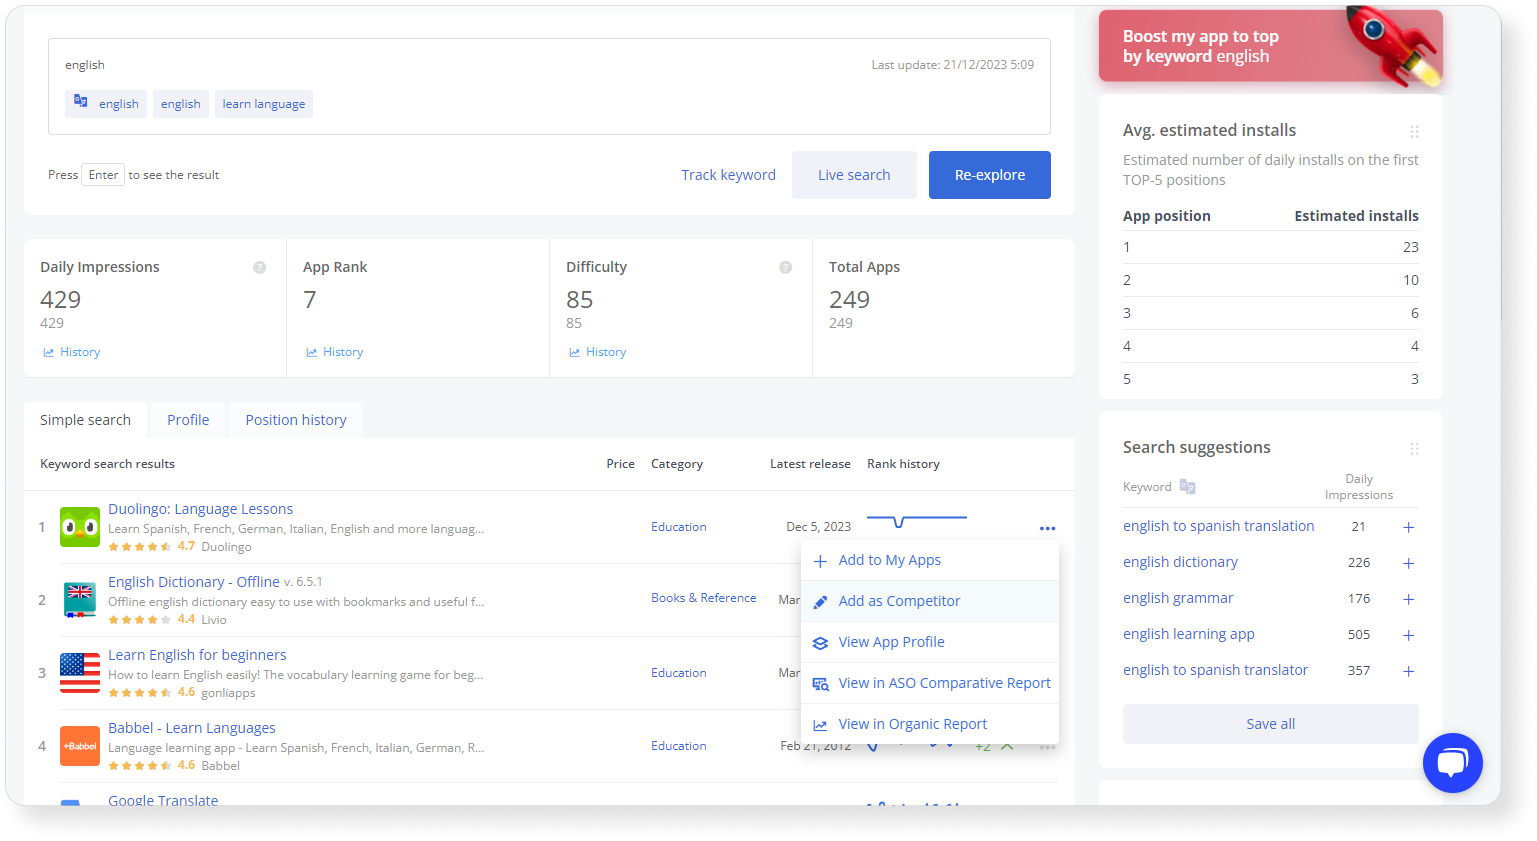
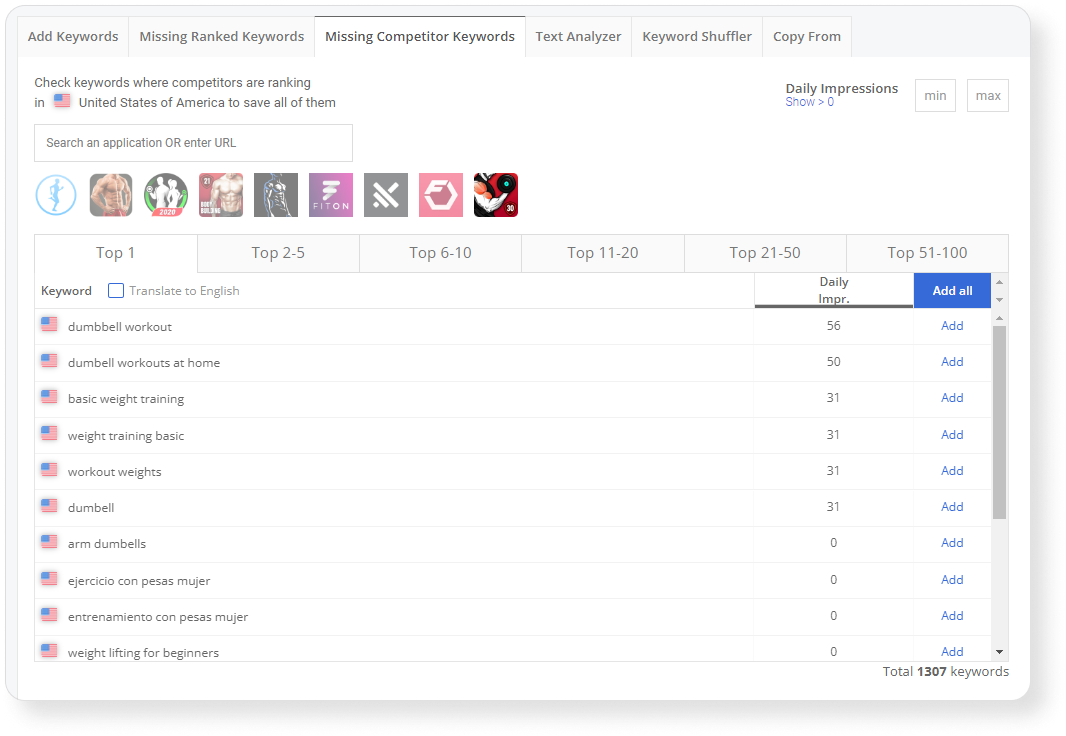
After you have added your competitors to your list, check keywords for which they are ranked:
Missing Competitor Keywords. This tool shows queries for which your competitors are in the top search results that are not yet in your semantic core.
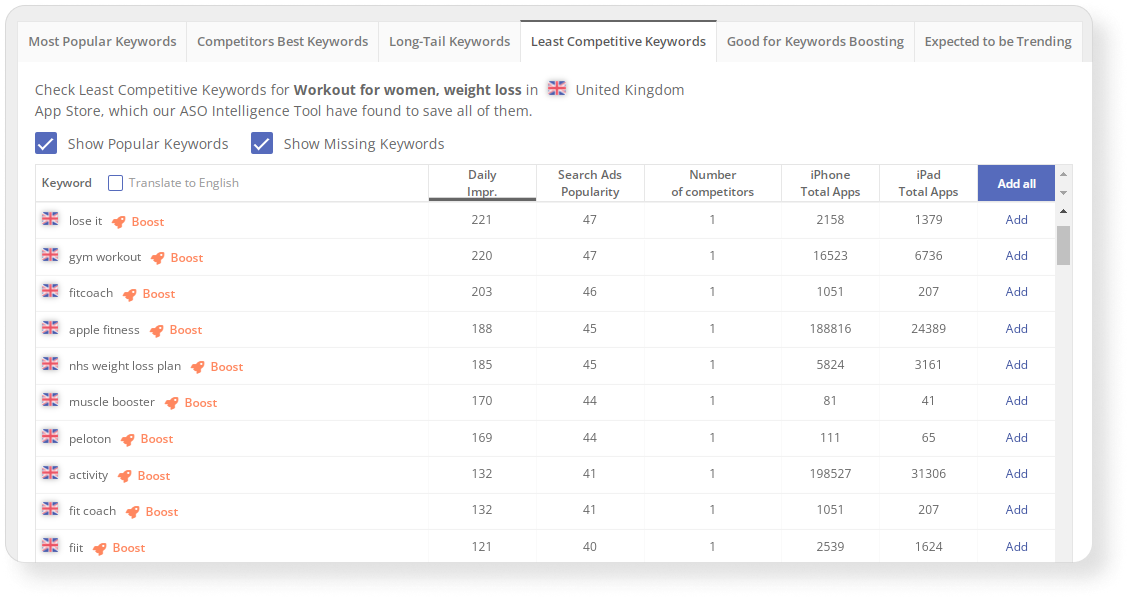
Least Competitive Keywords. With this feature, you can identify keywords that your app’s competitors rarely use, meaning you have better chances of improving your positions for them.
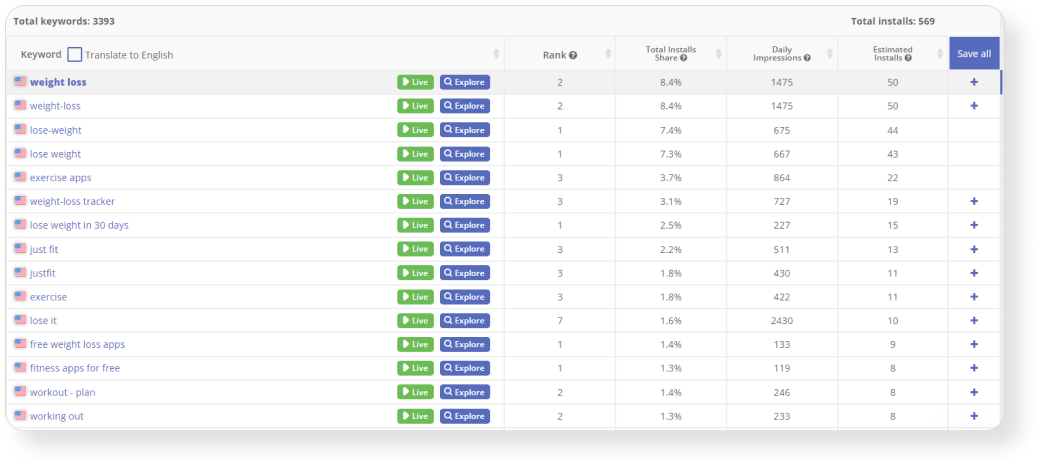
Organic Report. With this tool you can find the keywords from which your competitors gain installs. You will see what place your app has (Rank), the number of impressions per keyword (Daily Impressions), and the estimated number of installs per keyword (Estimated Installs).
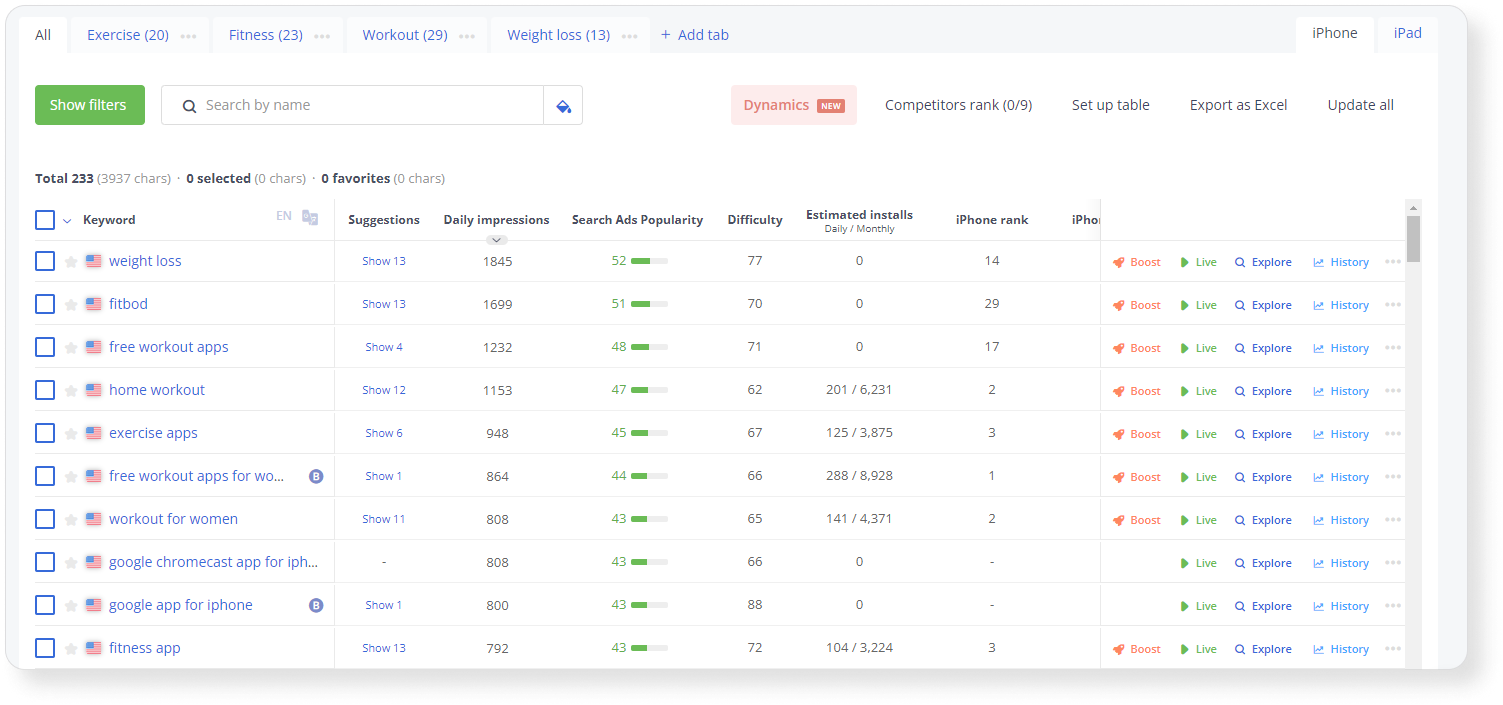
While using all these tools, you should save relevant keywords to your app’s semantic core. On Asodesk, you can manage your semantic core in the Keyword Table and then use the keywords from this tool while creating your app metadata.
This is just an overview of how you can use ASO to increase your app’s visibility and traffic. Find all the top tips in our comprehensive ASO guide for 2024.
7. Set up your store listing
At this stage of publishing an app on Google Play, you need to add textual and visual metadata on Google Play. First of all, fill in the “listing assets”, which encompass textual metadata fields: app name, short and full description.
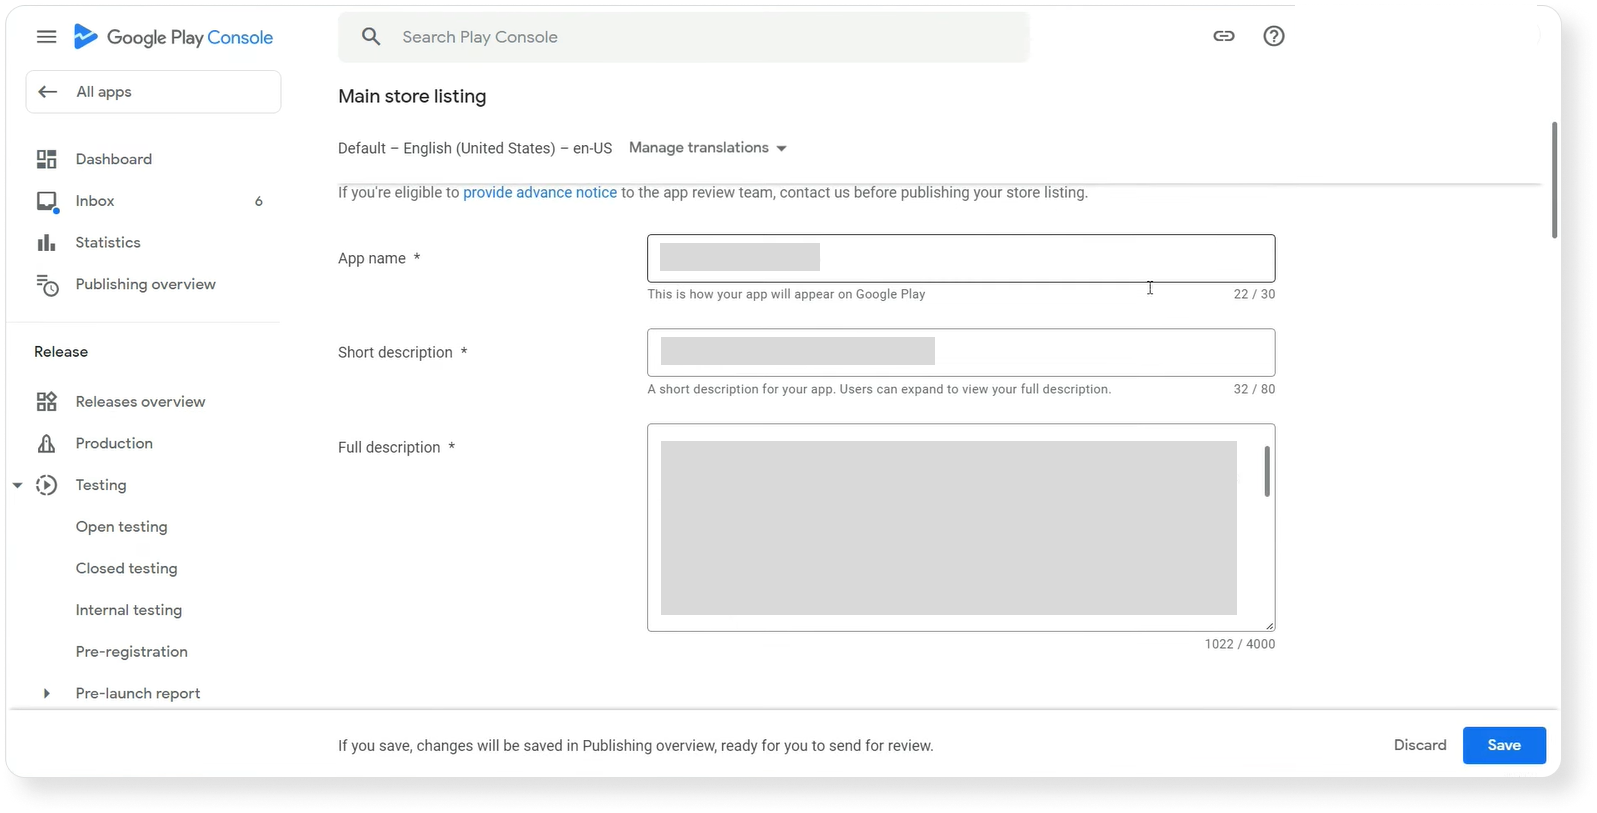
App name
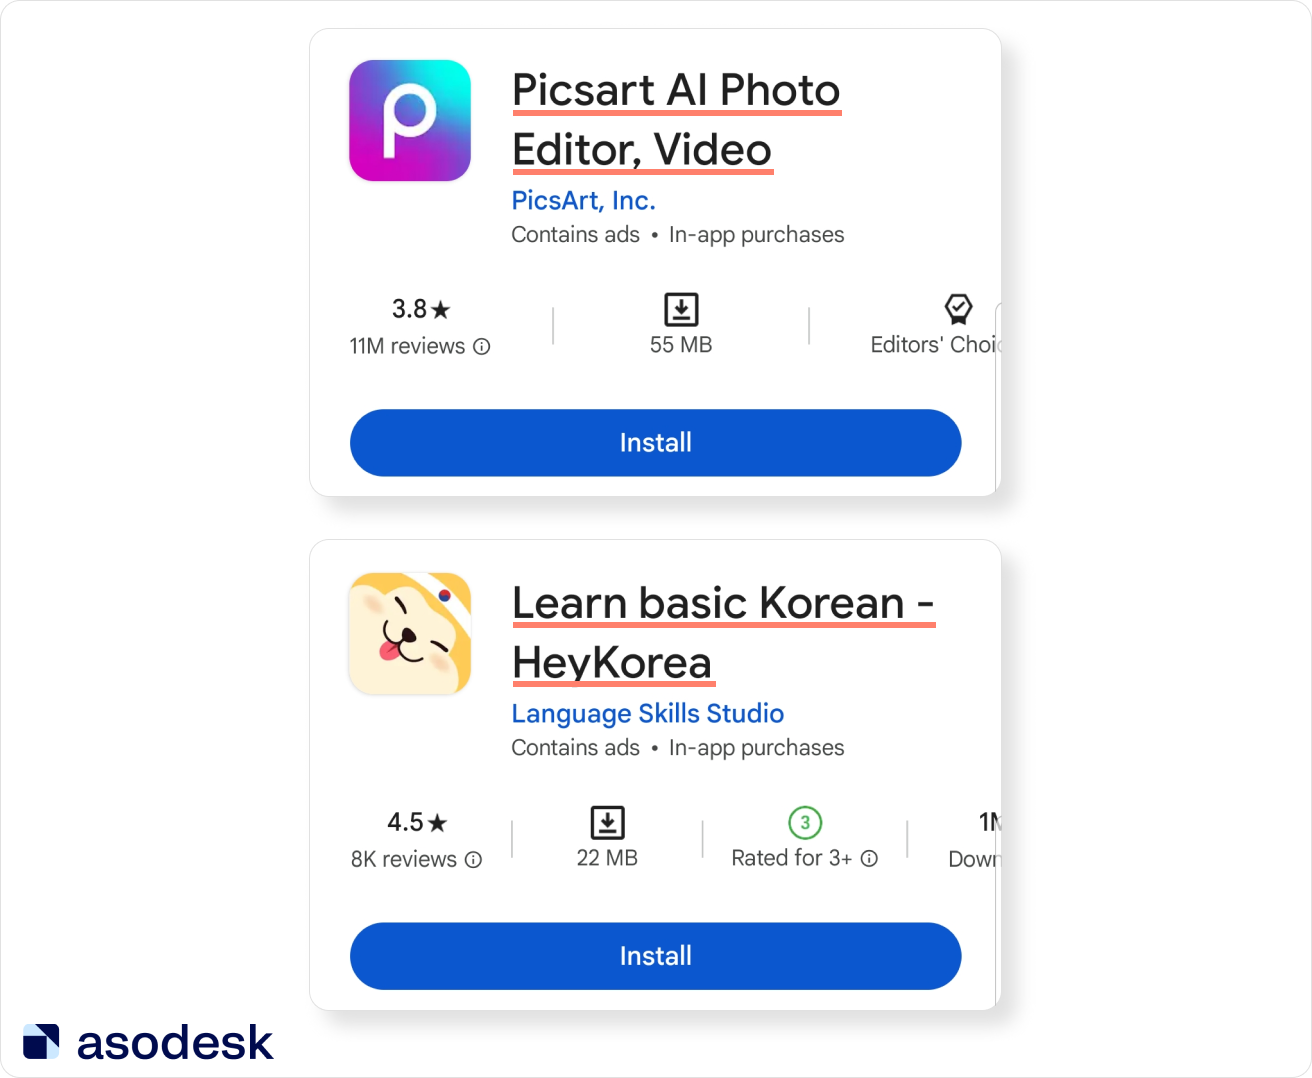
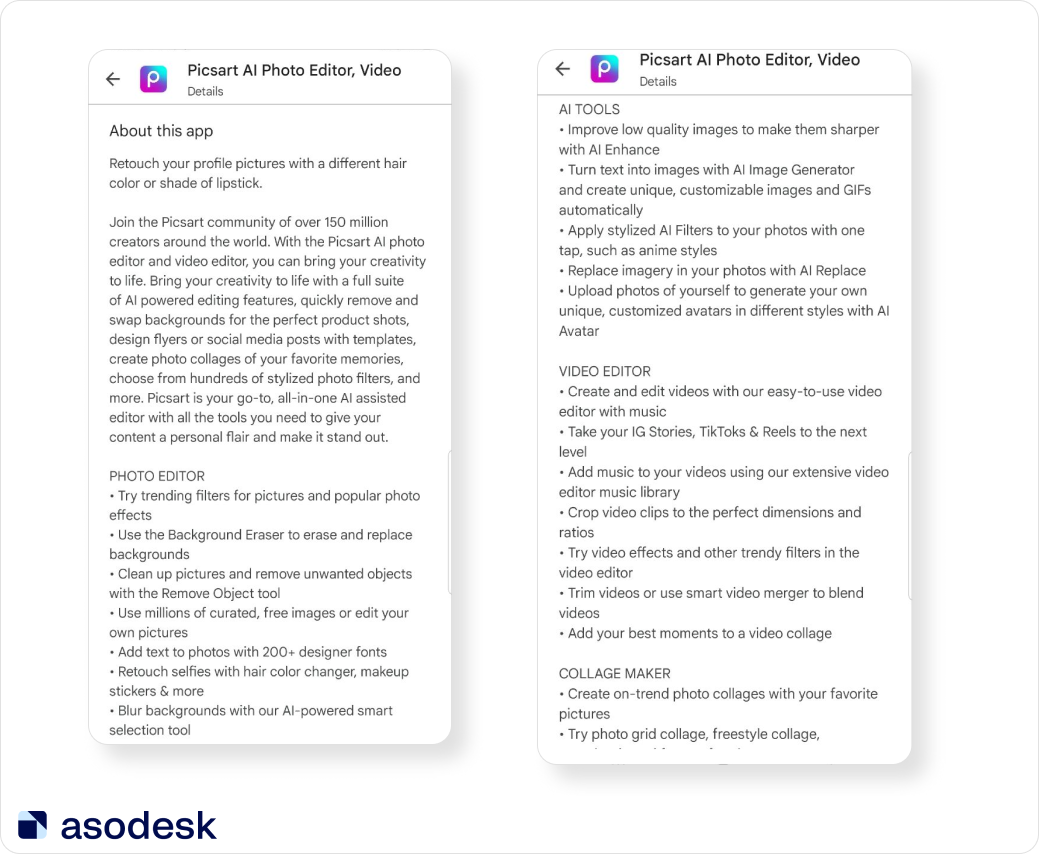
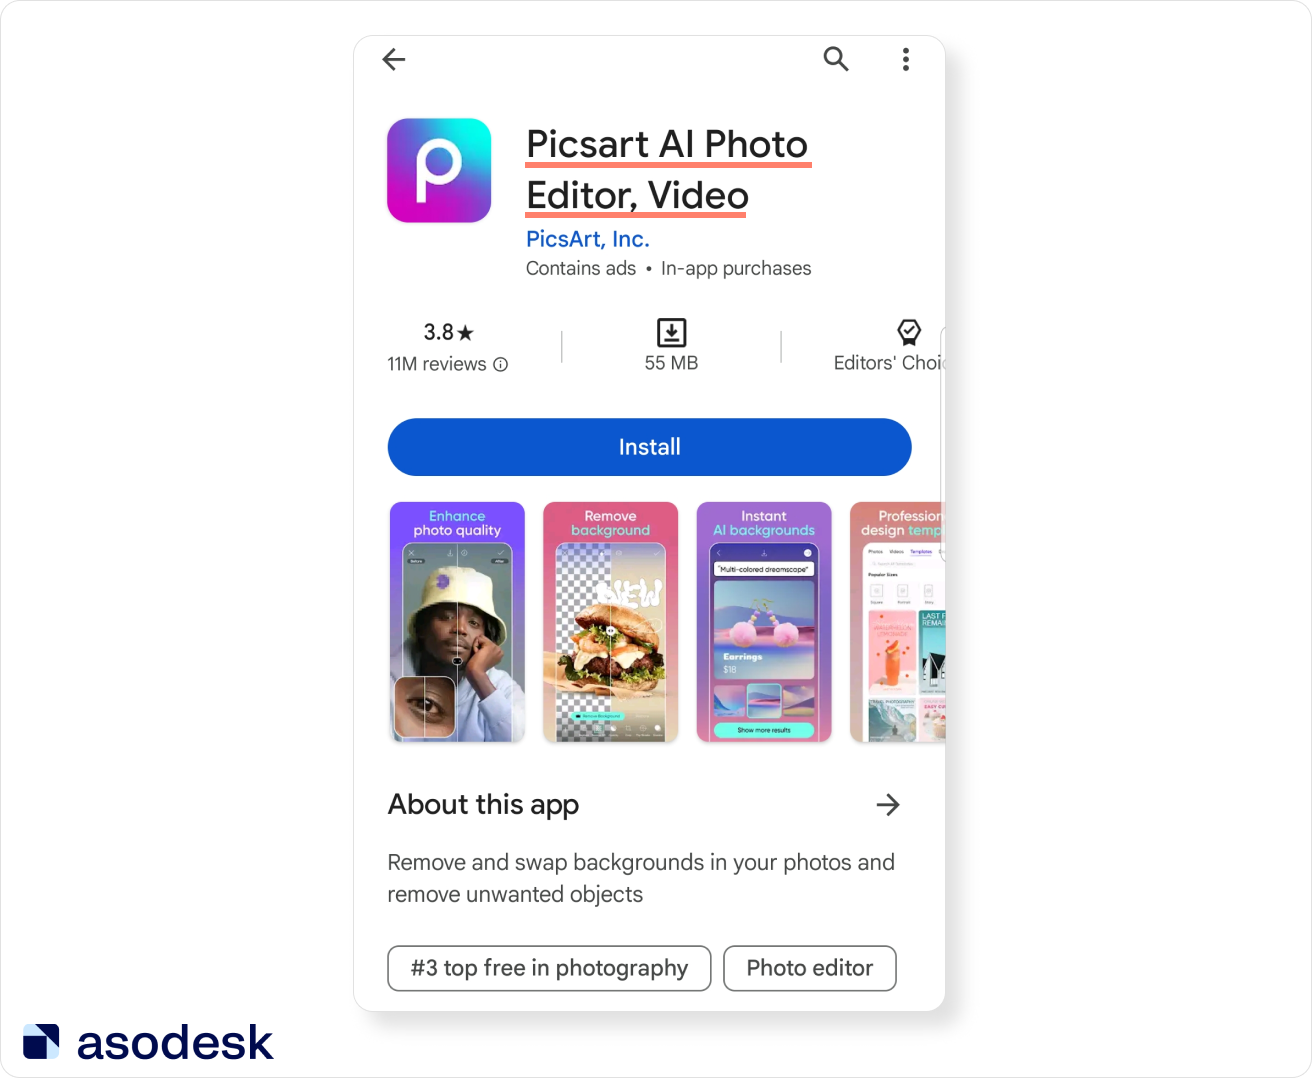
This is limited to 30 characters. Users should be able to glance at the name and immediately understand what the app’s purpose is and how it can assist them. For example, with this app title, users can understand that the app helps to edit their photos and videos with AI functionalities.
It’s important to create not only a clear and informative app title but also to include keywords in it.
Text Metadata Builder in Asodesk will help you to create a name, short description, and full description for your app and check if you have included all the important keywords from your app’s semantic core in your textual metadata.
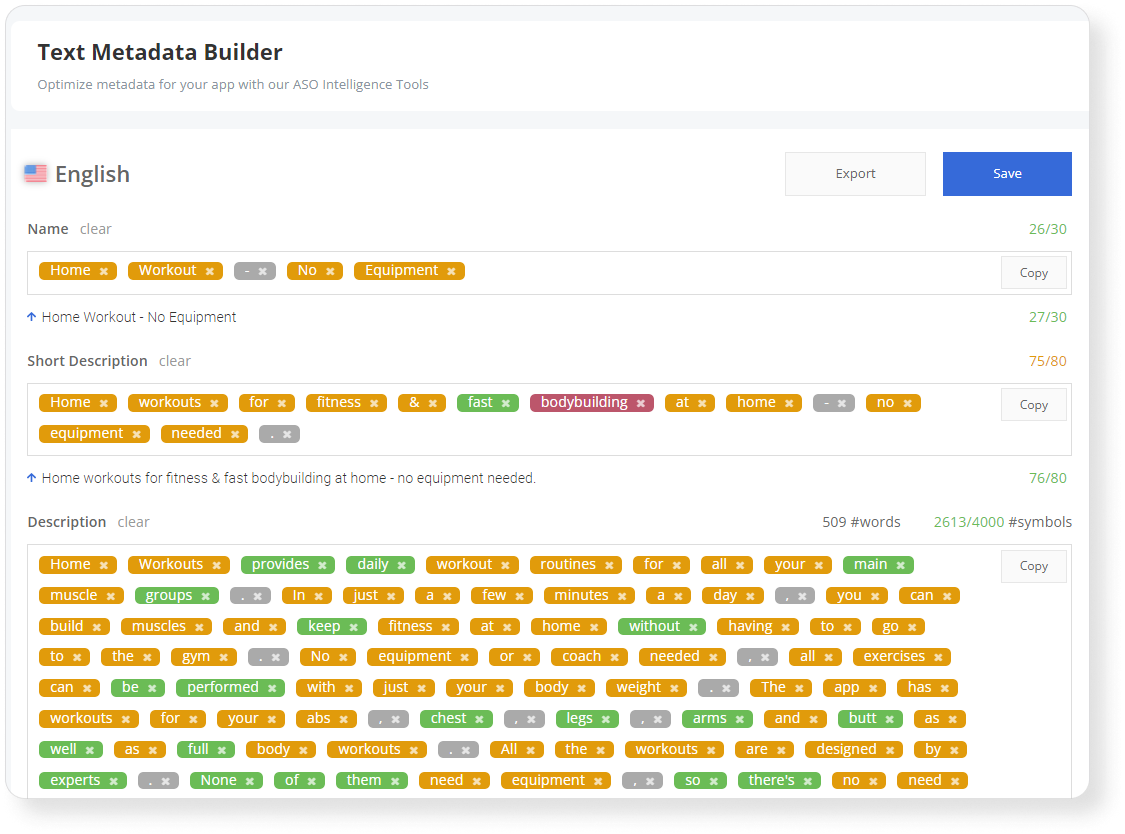
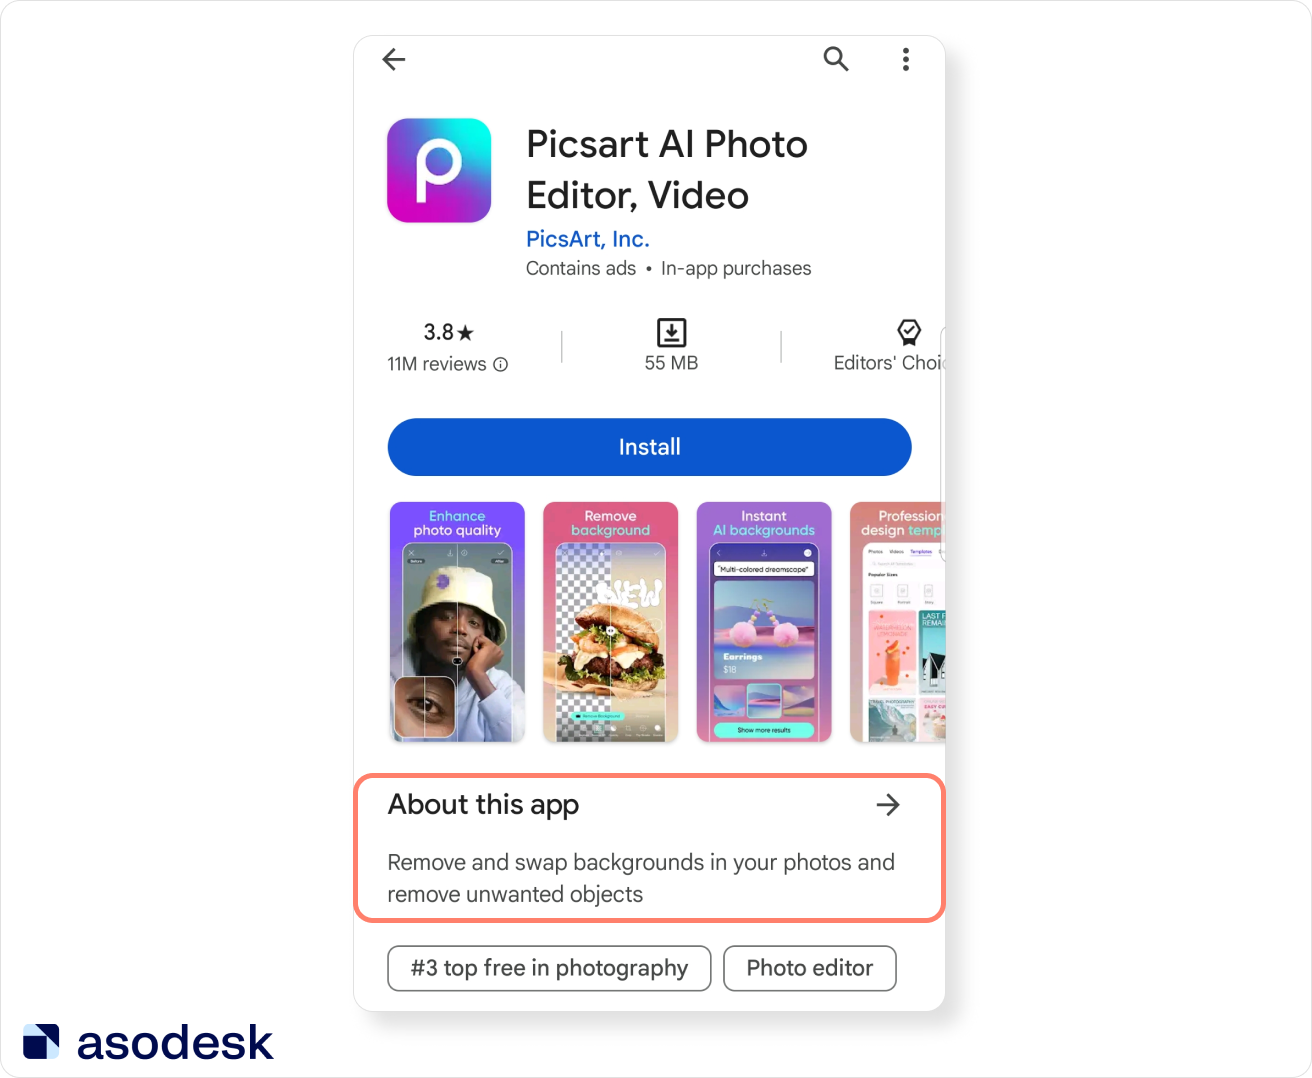
Short description
This has an 80-character limit. Users see the short description on the app page below the app screenshots. They can click the “read more” button to view the full app description.

The short description is indexed by Google Play algorithms, so it is important to include popular search queries here. A good short description should highlight an app’s key features while incorporating important keywords.
Full description
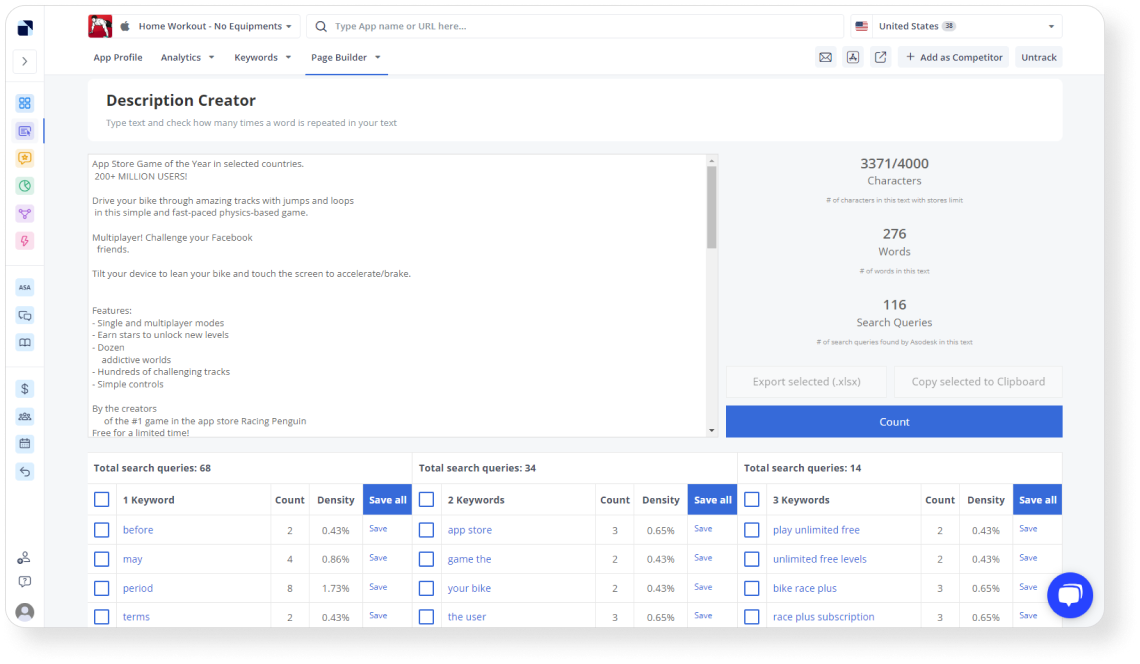
The full description has a 4000-character limit. Typically, only a small percentage of users read the description. However, it is indexed by Play Store algorithms. Therefore, it’s crucial to add keywords to the full description.
It’s recommended to repeat the most important keywords about 3–5 times, with a keyword usage frequency of around 3%. Otherwise, Google Play moderation might consider your full description as spam, which could negatively affect your app’s search ranking. However, some Angle Agency clients have experienced cases where a keyword density of more than 5% positively impacted their rankings.
You can check keyword repetitions and keyword density using the Description Creator tool on Asodesk.
Although users rarely read the full description, it can still have a positive impact on conversion. Therefore, it’s crucial to provide a detailed explanation of your app’s Unique Selling Proposition (USP), its important features, and competitive advantages here.
Note: Google warns that repetitive and irrelevant keywords can lead to the suspension of an app on Google Play.
Next, you need to fill out the visual section, where you should fill out the relevant metadata elements.
App icon
This is the primary graphical element that appears everywhere alongside the app’s name: on its page, in the search results, in the editorials sections, and on the top charts.
The icon needs to reflect your app’s purpose and stand out among competitors in search results, as this will help attract the audience’s attention. Icons and other visual metadata significantly impact conversion, so we recommend you conduct A/B testing to select the most effective icon.
Icon size requirements:
- 32-bit PNG (with alpha)
- 512 x 512 pixels
- Maximum file size: 1024 KB
When preparing the icon, it’s crucial to adhere to Google Play’s icon design specifications.
Feature graphic
The feature graphic is a horizontal banner that is reflected at the top of your app page, as a cover for a game’s video preview, and under your app name and icon in editorial collections.
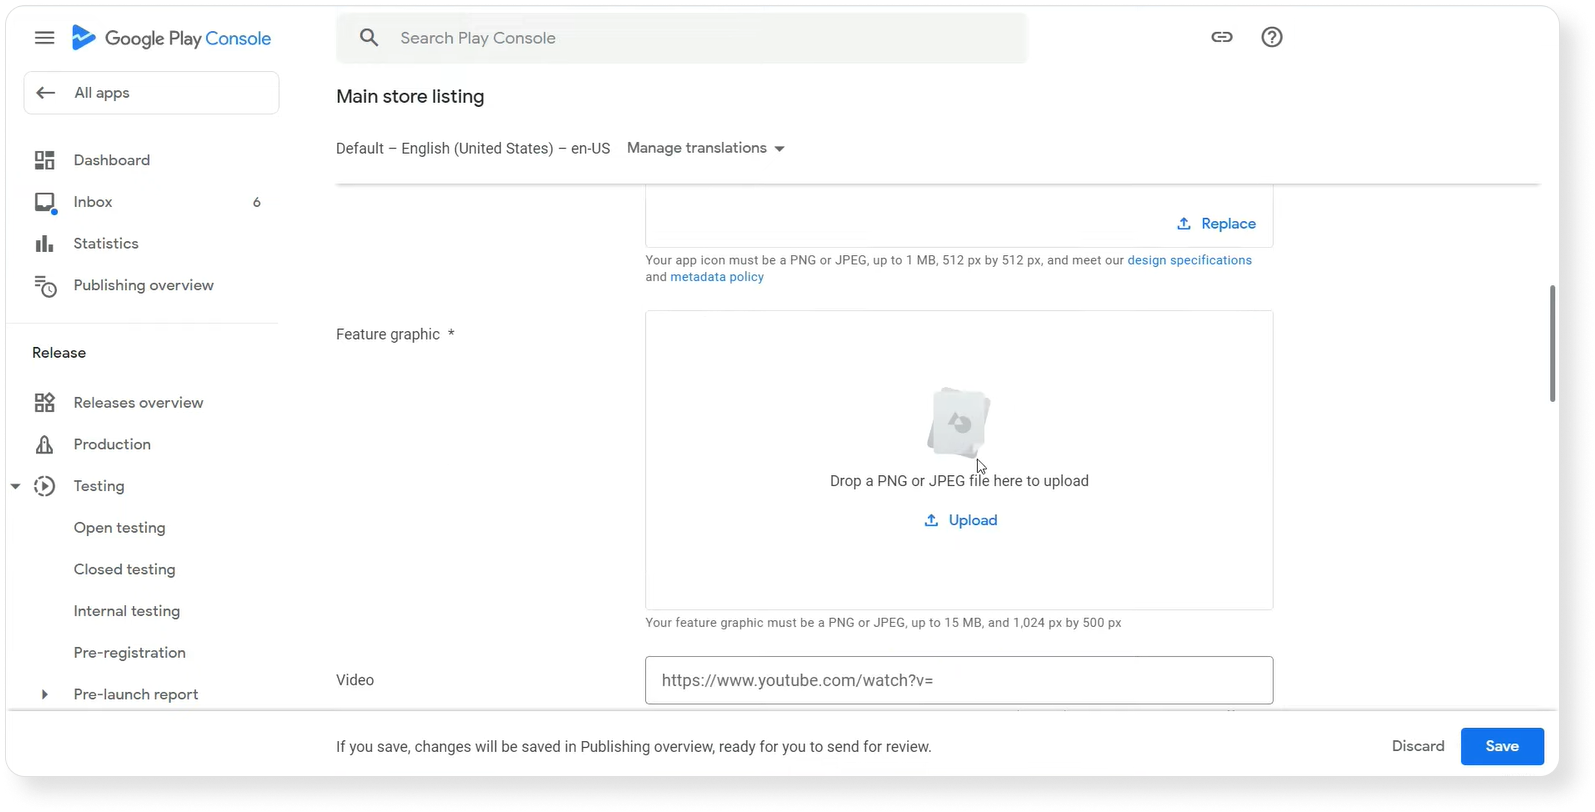
This element is very important as it helps to attract users from editorial selections to your app page. It is also the first element that users see when visiting your app page.
Requirements for the banner:
- JPEG or 24-bit PNG (without an alpha channel)
- Dimensions: 1024 x 500 pixels
When preparing an app banner, take into account these recommendations from Google Play:
- Avoid using an image that closely resembles your icon to prevent content duplication.
- Do not add small details to the graphics as they may not be visible on phone screens.
- Keep the main elements centered within the banner.
- Avoid placing important elements such as the brand logo, app name, primary slogan, and user interface in cropping zones (highlighted in red in the example below).
- Take crop zones into account for the feature banner.

- Refrain from using purely white, black, and dark gray colors, as they may blend with the Google Play background.
You can find further banner-related recommendations in the Google Play Help Center.
Preview video
If you want, you can add a preview video for your app, which will be displayed above the first screenshots on your app page, in the search results for branded queries, and in some selections for recommended games. Google advises using your preview video, especially for games.
However, you should conduct an A/B test before submitting a preview video or app screenshots to understand which of your variants would be better.
To add your preview video to the app page, you first need to download it to the YouTube app page. Use a full link on YouTube — not the shortened one.
The preview video can autonomously start playing without sound for a duration of up to 30 seconds, depending on the user’s device, settings, network conditions, and screen size. If the video doesn’t play automatically, a play button will appear on your feature graphic.
Read all the requirements for adding preview videos on Play Console Help.
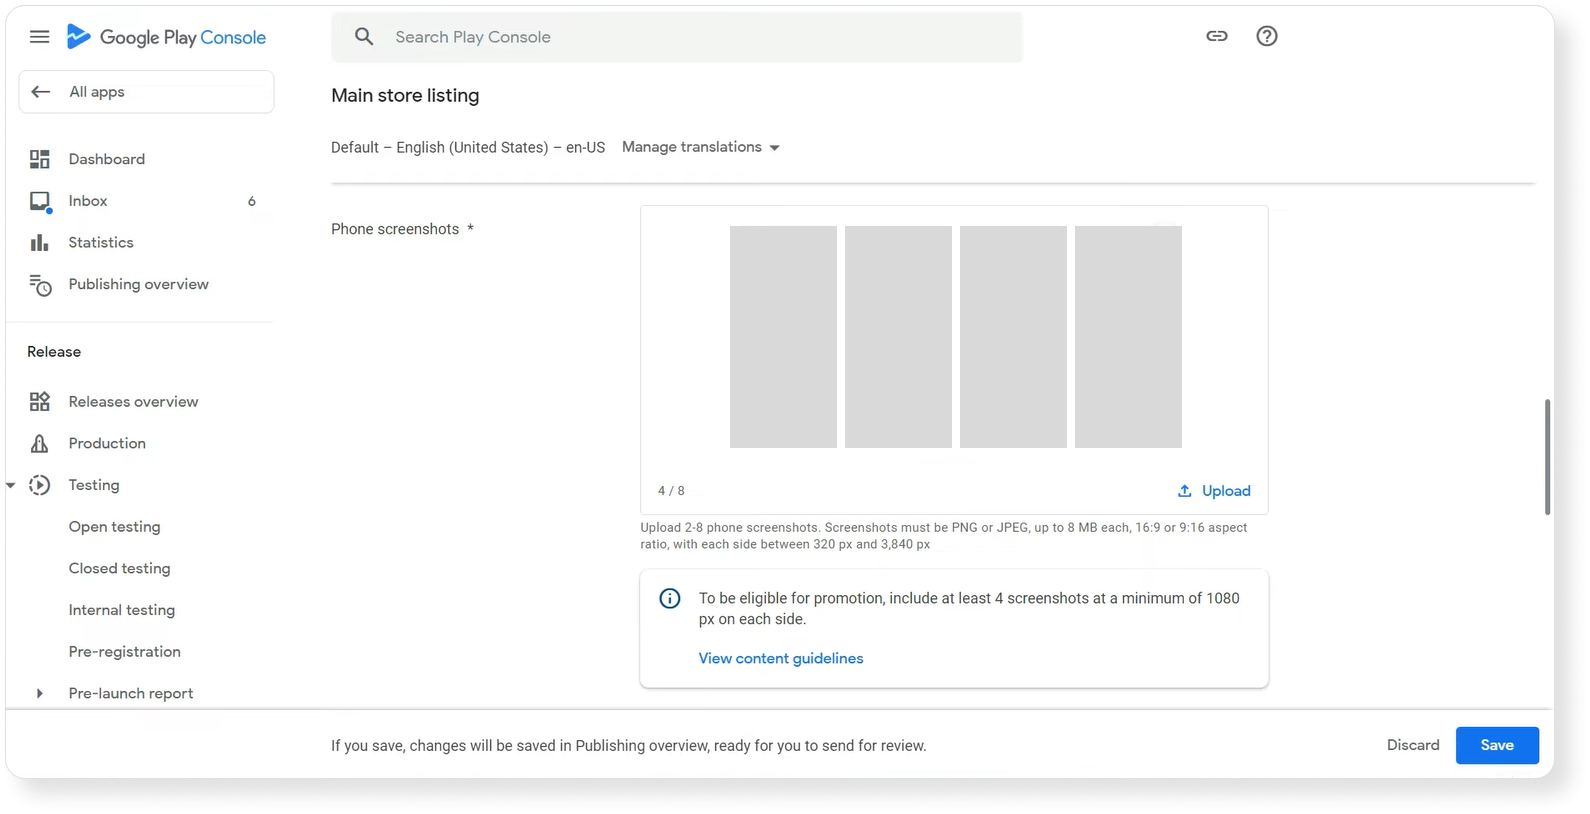
App screenshots
Screenshots allow you to show your app or game’s features graphically. You can upload 2–8 screenshots, which will be displayed on your app page.
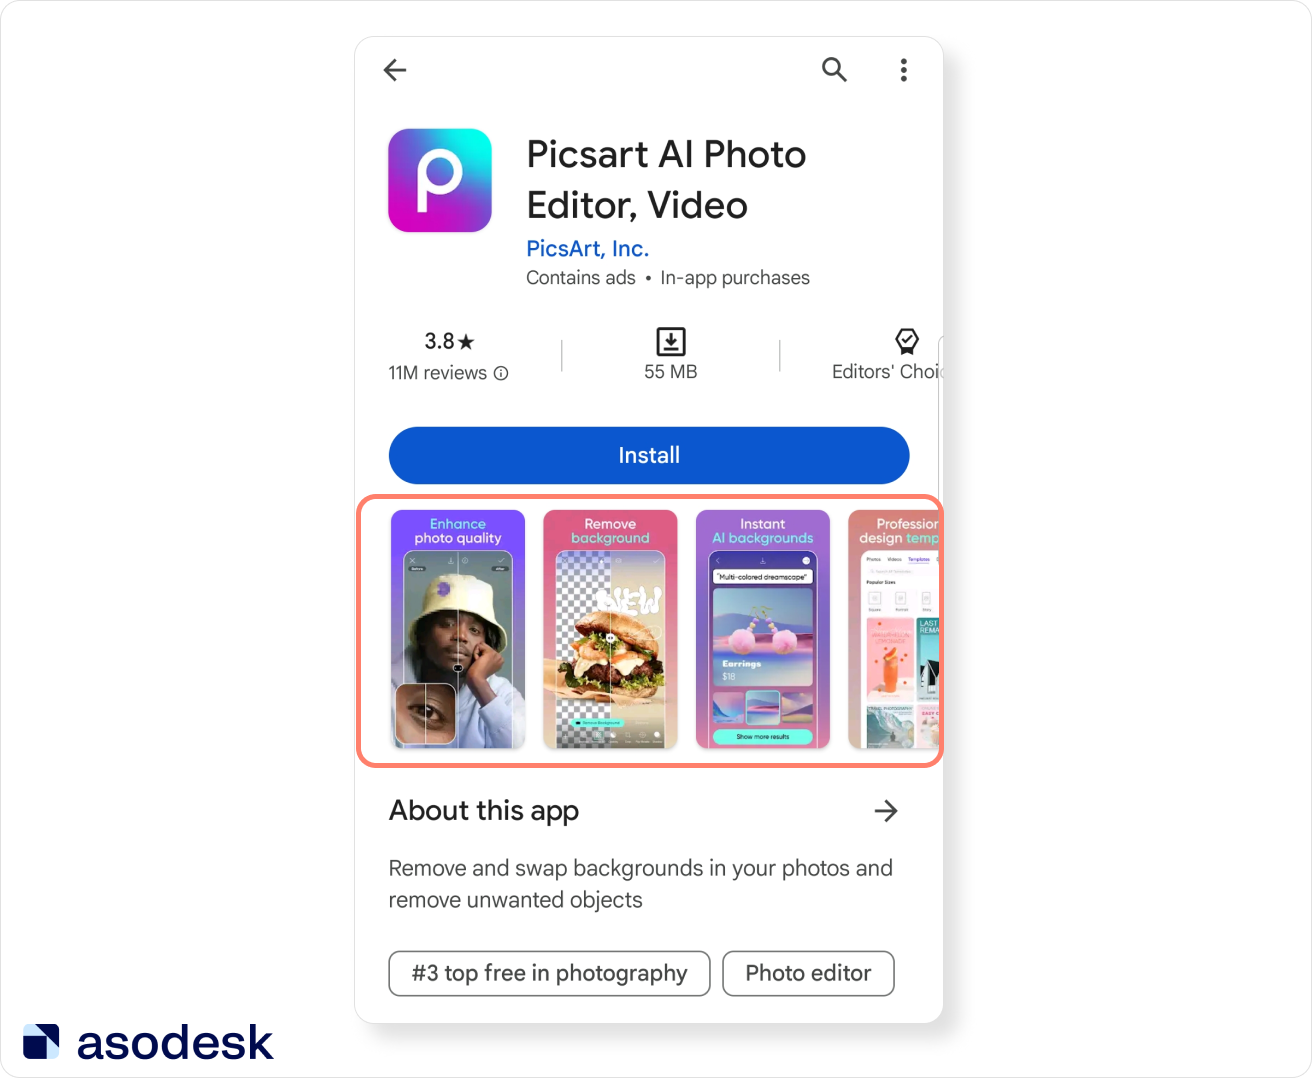
Read more on how to design your app screenshots in Google Play support.
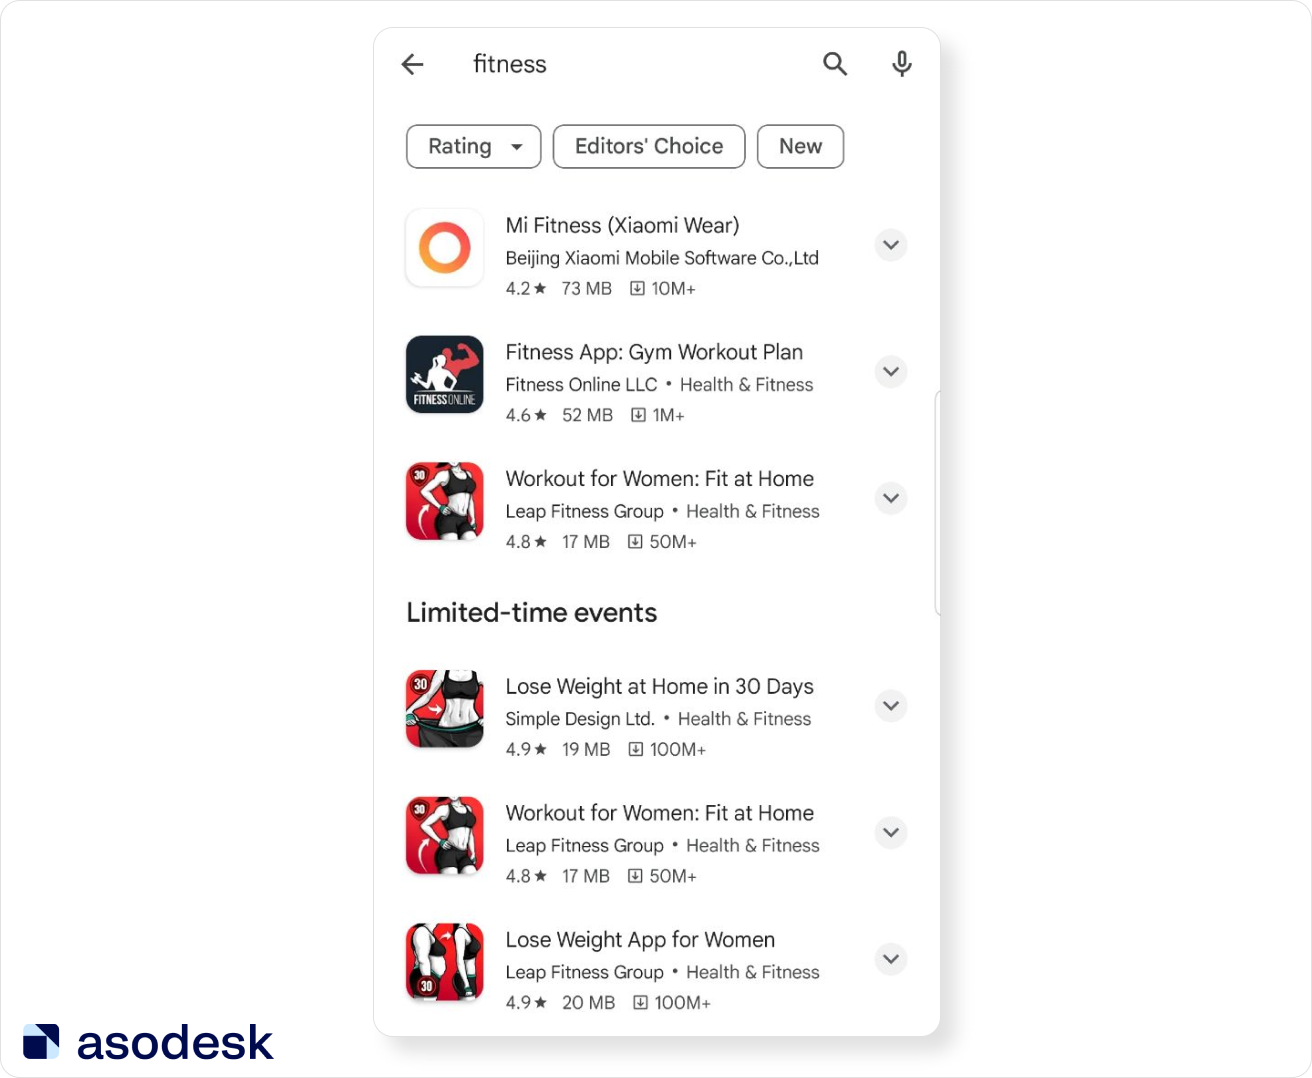
If a user uses a non-branded query, such as “photo editor”, they will see your short description and app screenshots in the search results when clicking the arrow next to your app’s title.
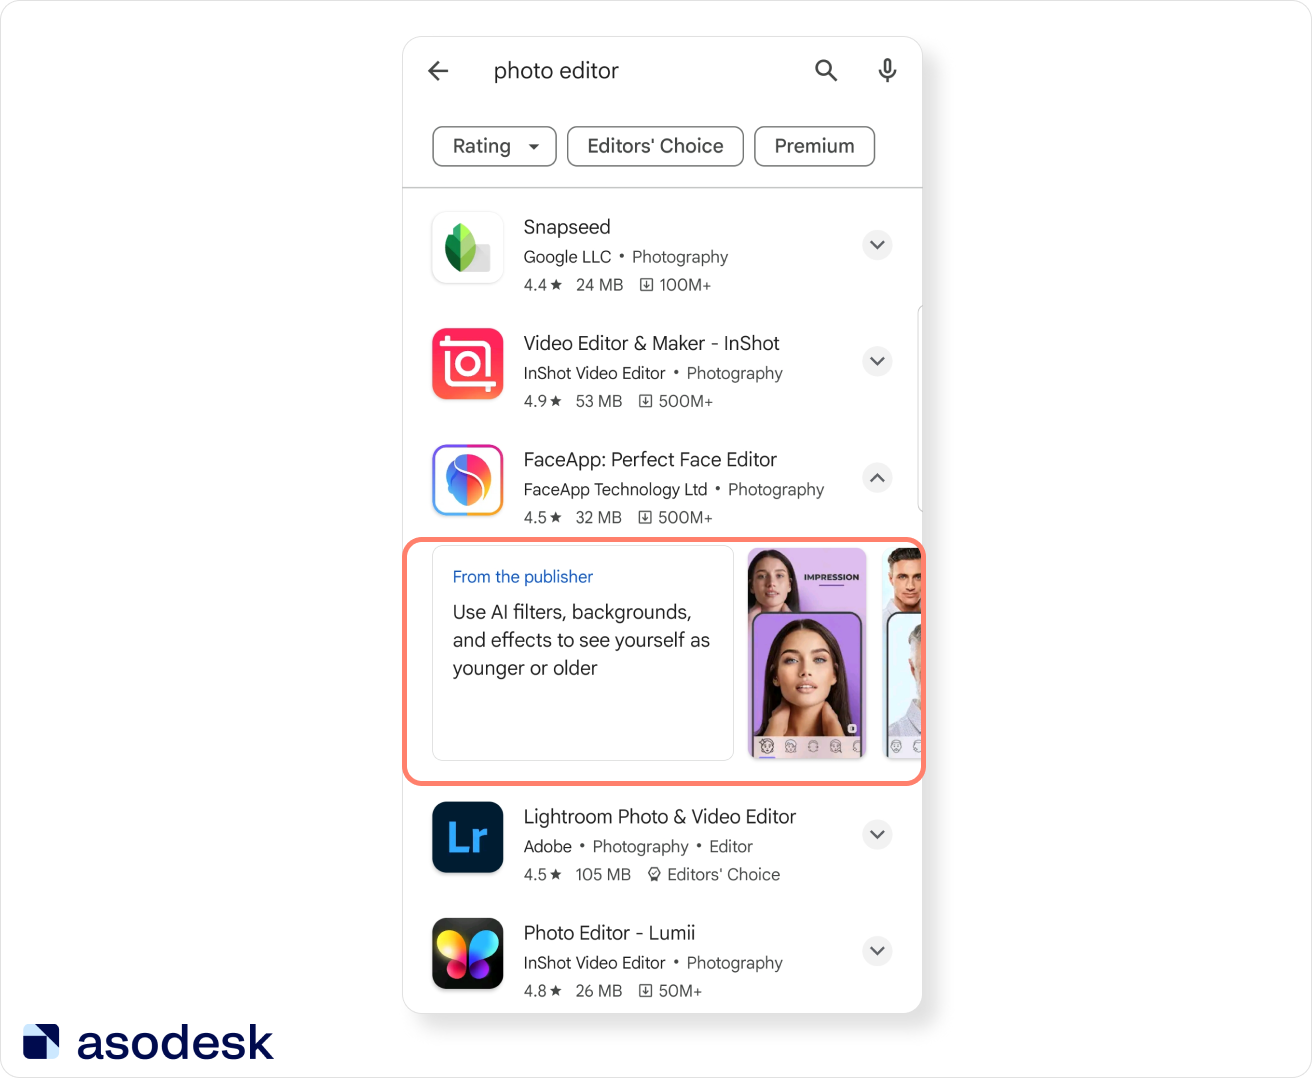
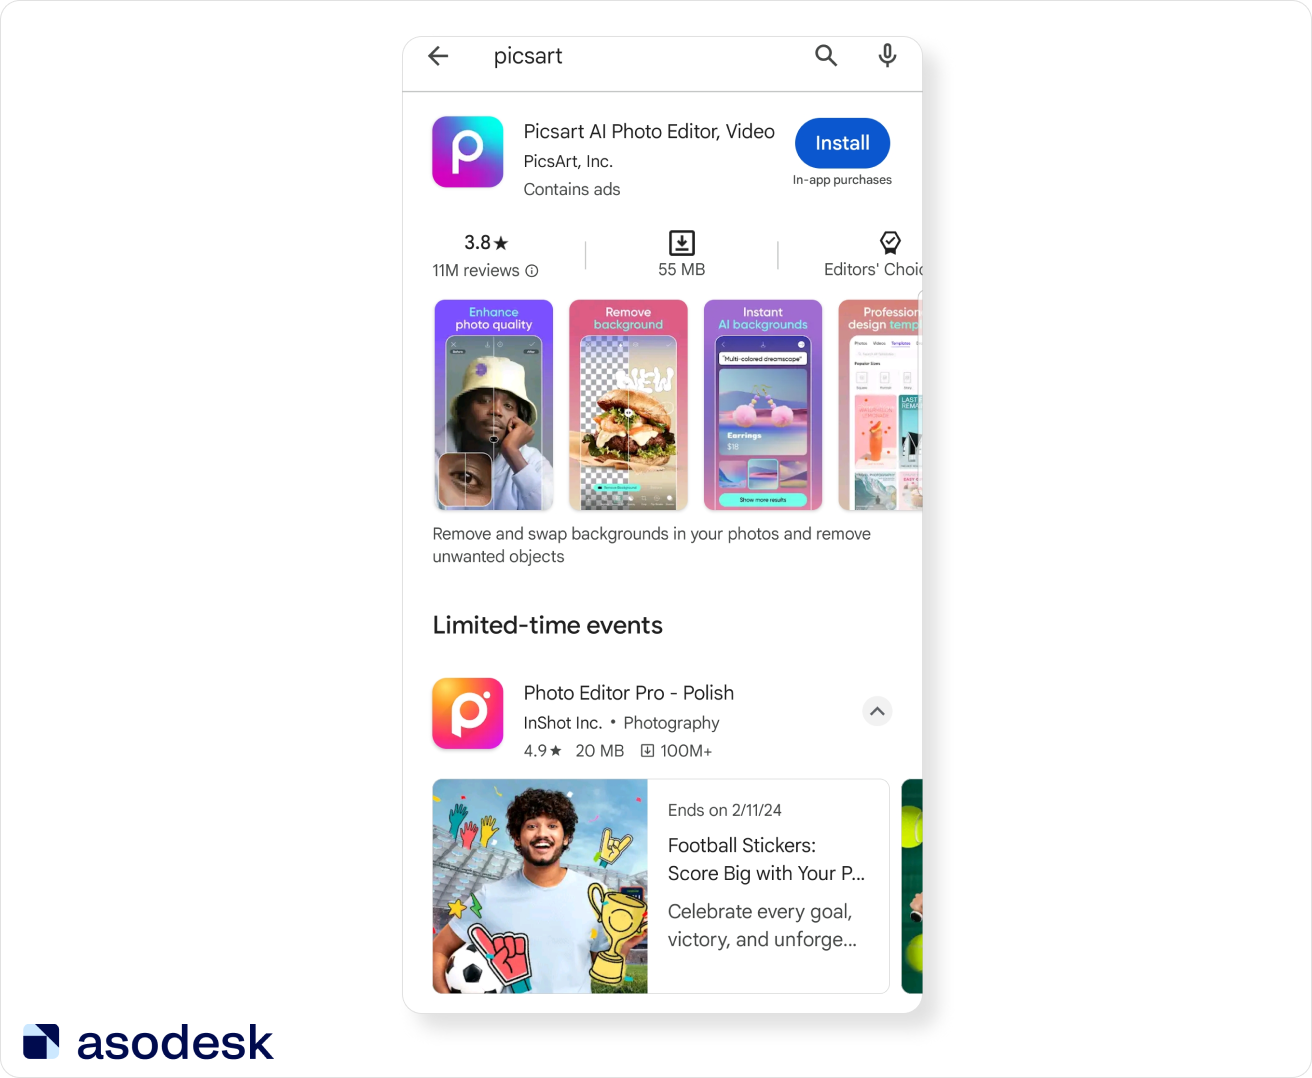
If a person uses a branded query, such as “Photoshop” they will see screenshots in the search results.
On Google Play, you need to upload screenshots for different types of devices: phones, tablets (7-inch and 10-inch separately), and Chromebooks.
You can use vertical or horizontal app screenshots. To choose the most effective orientation that can influence your CVR, Alexander, the ASO Lead from Angle Agency, recommends running A/B testing. In Alexander’s experience, there have been cases where changing the orientation of screenshots significantly increased conversion rates.
When choosing horizontal screenshots, it’s essential to consider that the user’s impression of the app is largely formed by the first screenshot. Not every user will scroll further. If you opt for vertical screenshots, the user will immediately see several valuable offerings in the initial screenshots.
Before deciding on the orientation, you should also consider your app’s display mode — vertical or horizontal.
Google has a lot of requirements for creating app metadata, you can find all of them in the Google Play Policy Center.
Creating textual and visual metadata is a crucial process that determines the visibility of your app in search results and the number of installs from your target audience. To better understand how to increase your app installs and conversions with metadata, read our guides on creating textual and visual metadata.
8. Submit your app on the Play Store
Once you have completed all the steps outlined by Google, you can move to the final step: publishing your Android app.
But before you send the app to production, we strongly recommend testing it. The test will help you to find any problems and bugs in your app and correct them. Testing is a wide topic, so we can’t offer a complete guide in this article. You can learn more about testing in Play Console Help.
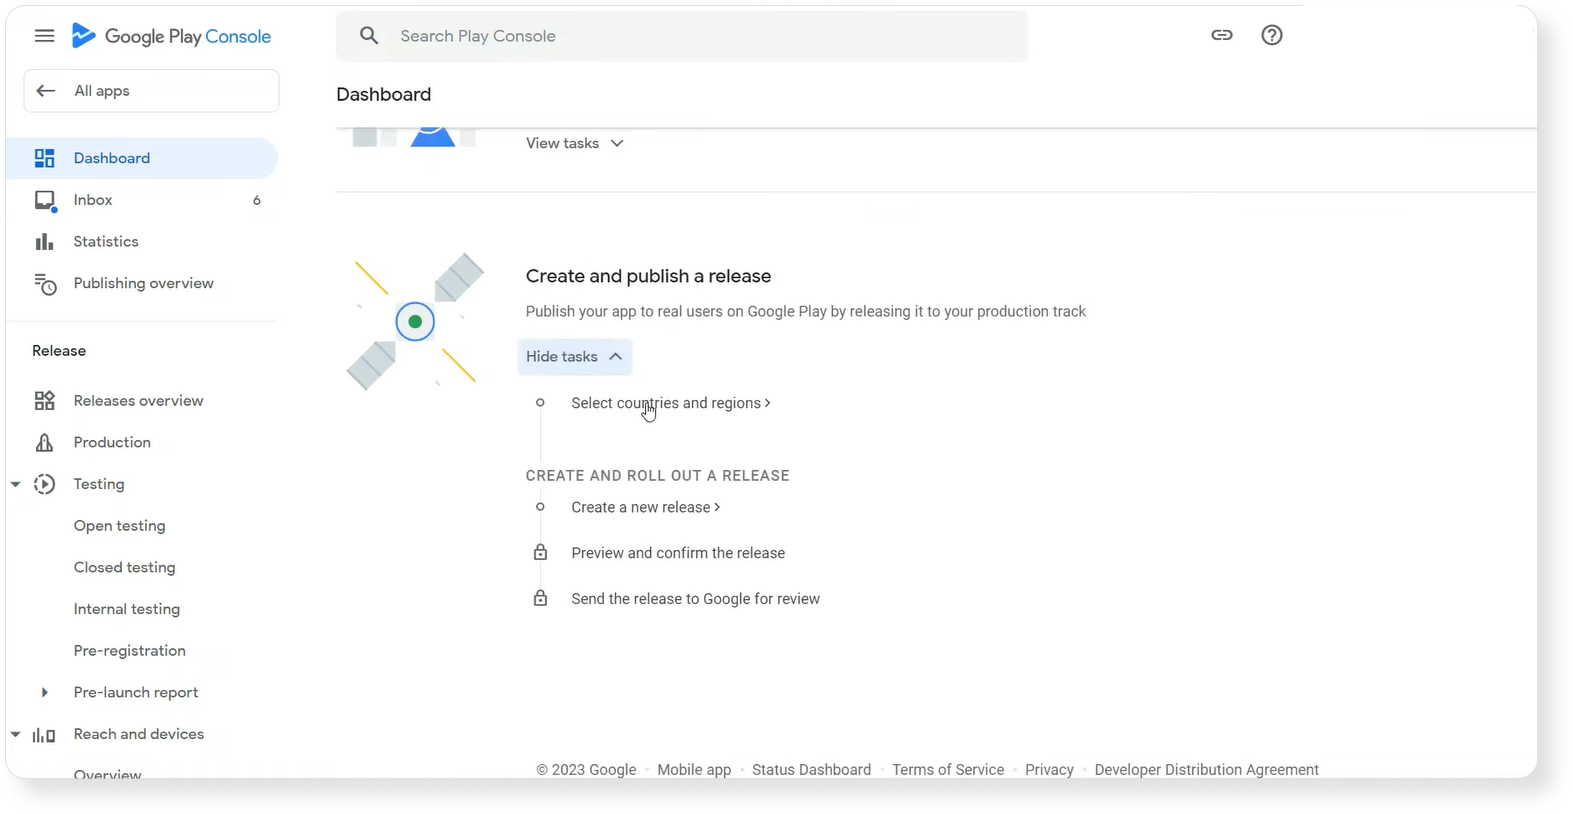
After you have run your testing, you can go to production to publish your app on Google Play.

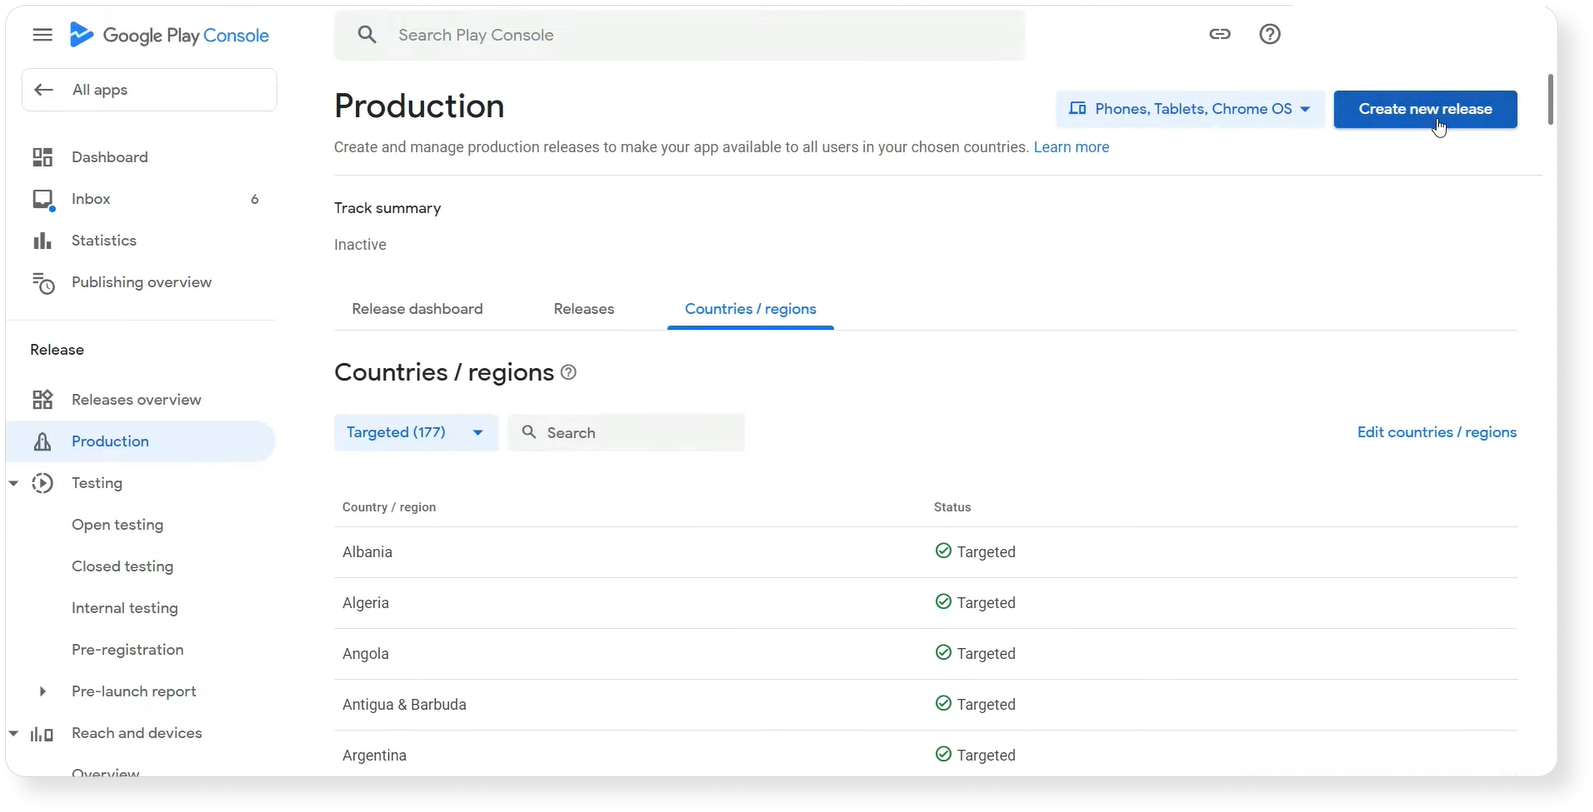
You need to complete several final steps in the “Сreate and publish release” section. Here you should choose countries and regions where your app will be published.
Then you need to choose which countries you would like to target your app in. You can choose all the countries or only some of them from the list shown below.
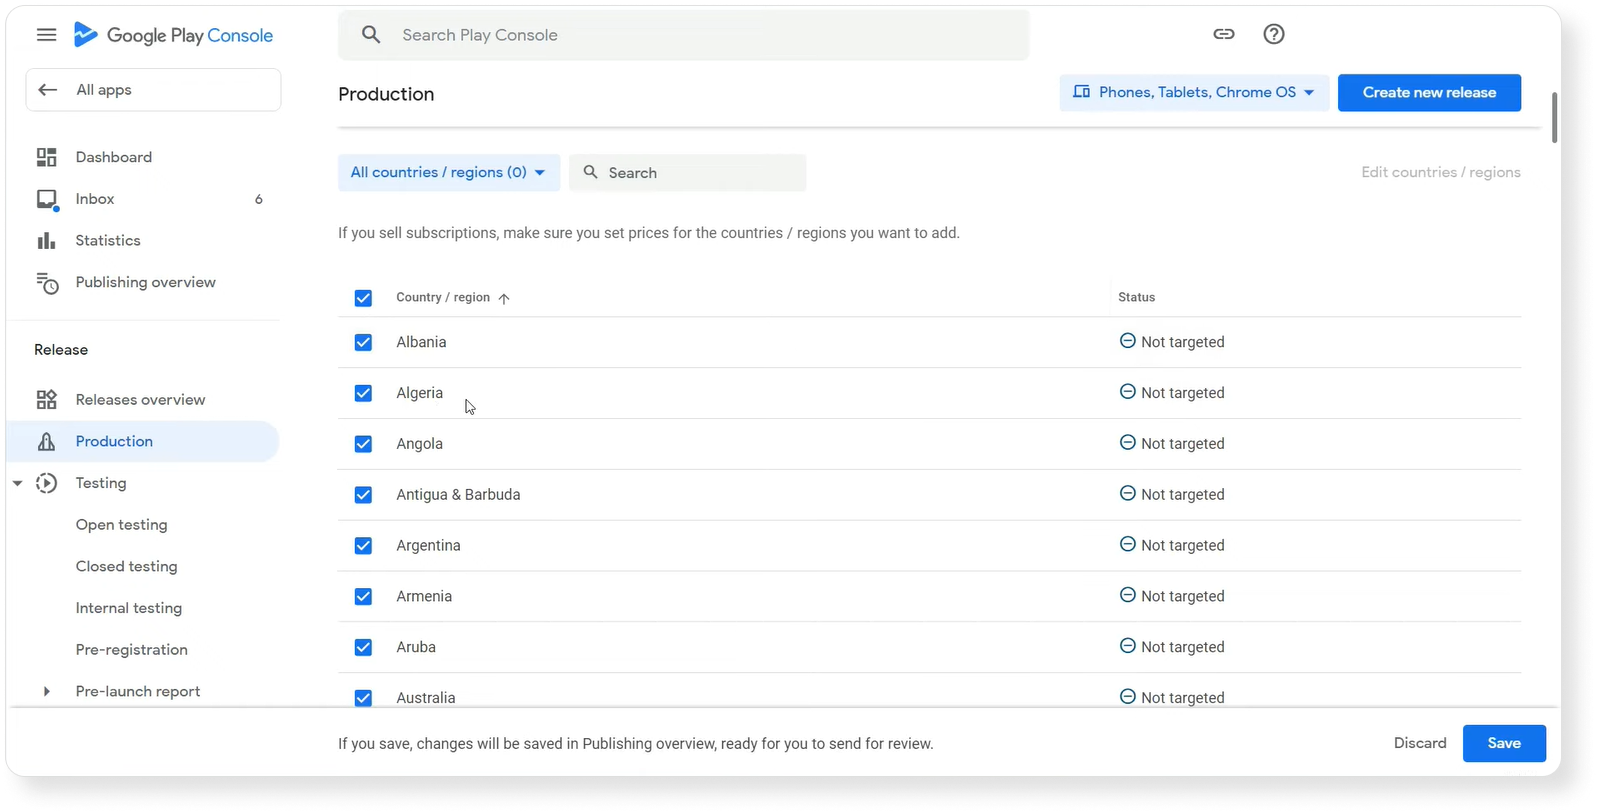
After selecting the countries, click on the “Save” button and then click on “Create new release” in the top-right corner.
Google will then redirect you to the “Create production release” page where you need to upload your App bundles file to Google Play.
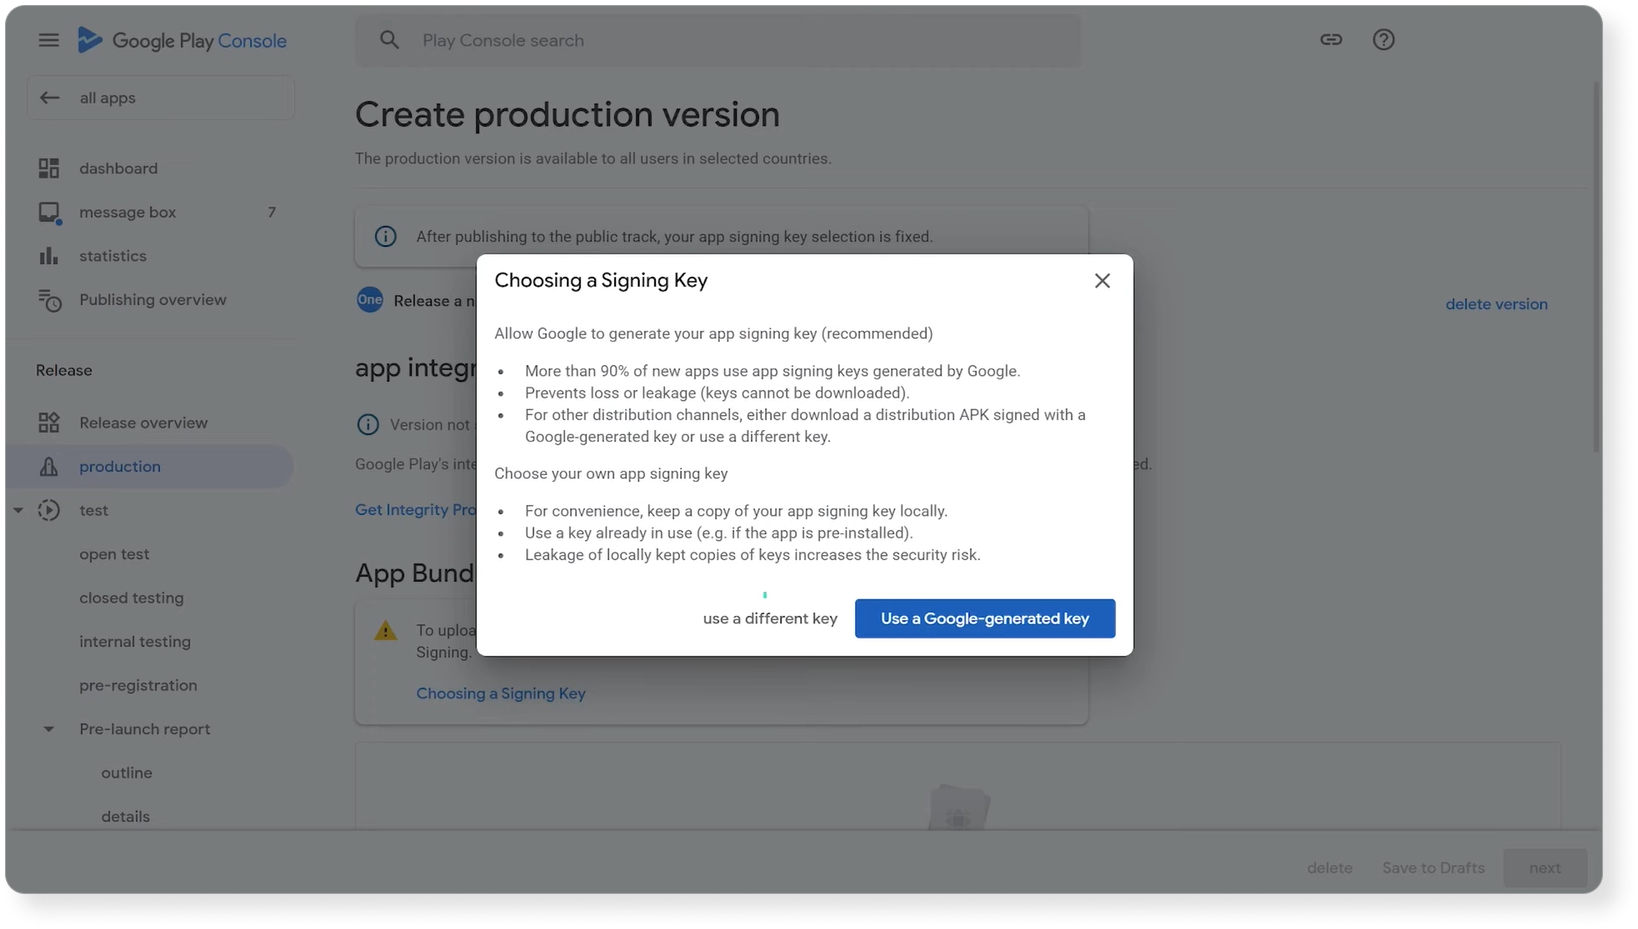
To upload your app bundles, you also need to choose a signing key for it.
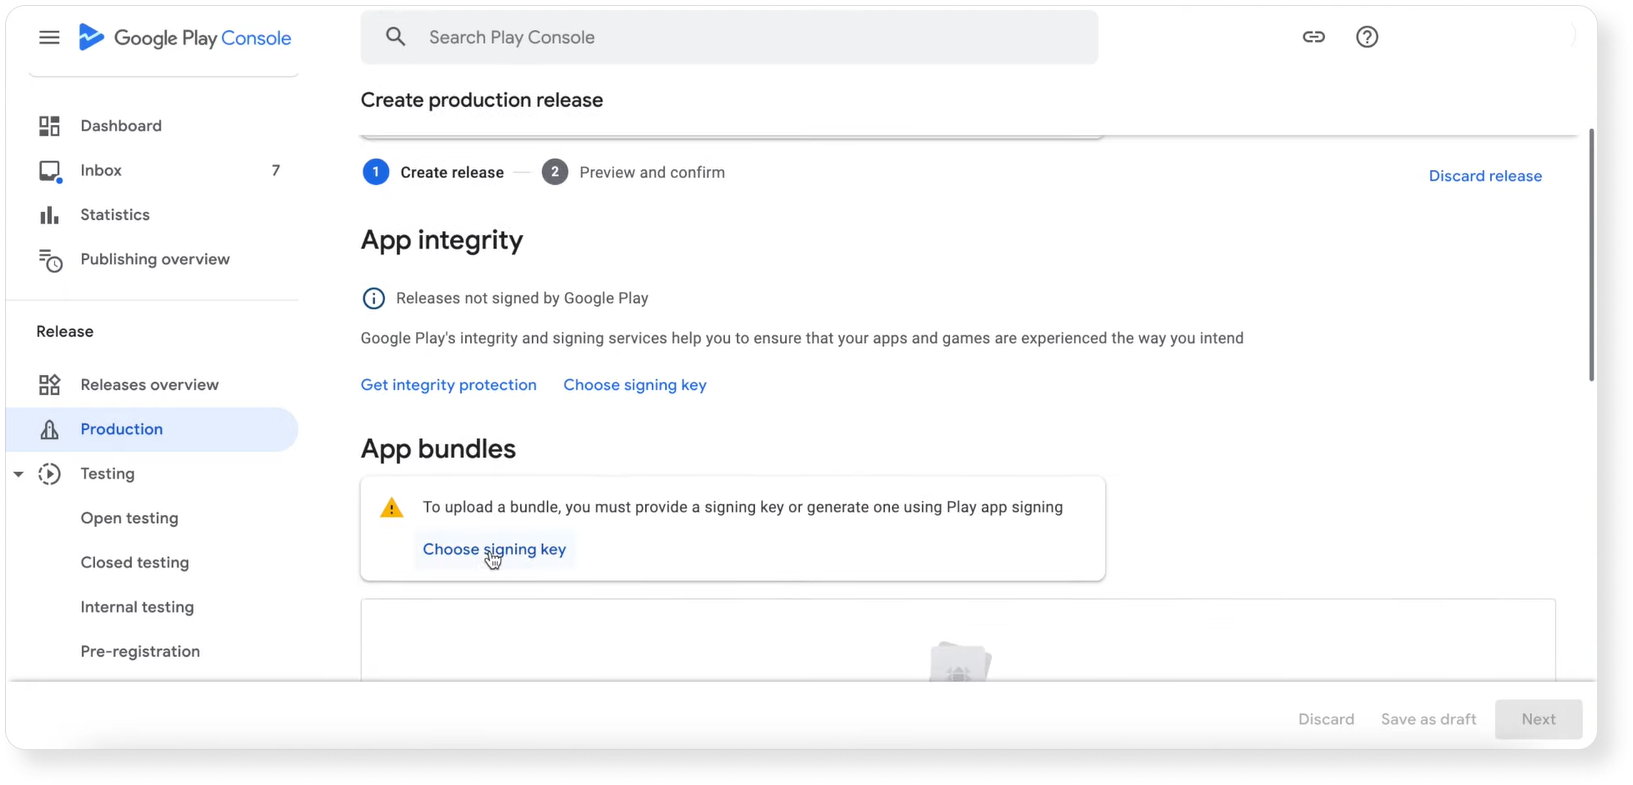
You can use a Google-generated key to save time.
Then you need to upload your file.

After downloading your file, Google will redirect you to the “Create production release” page. Here you can see some errors you should fix before publishing your android app.

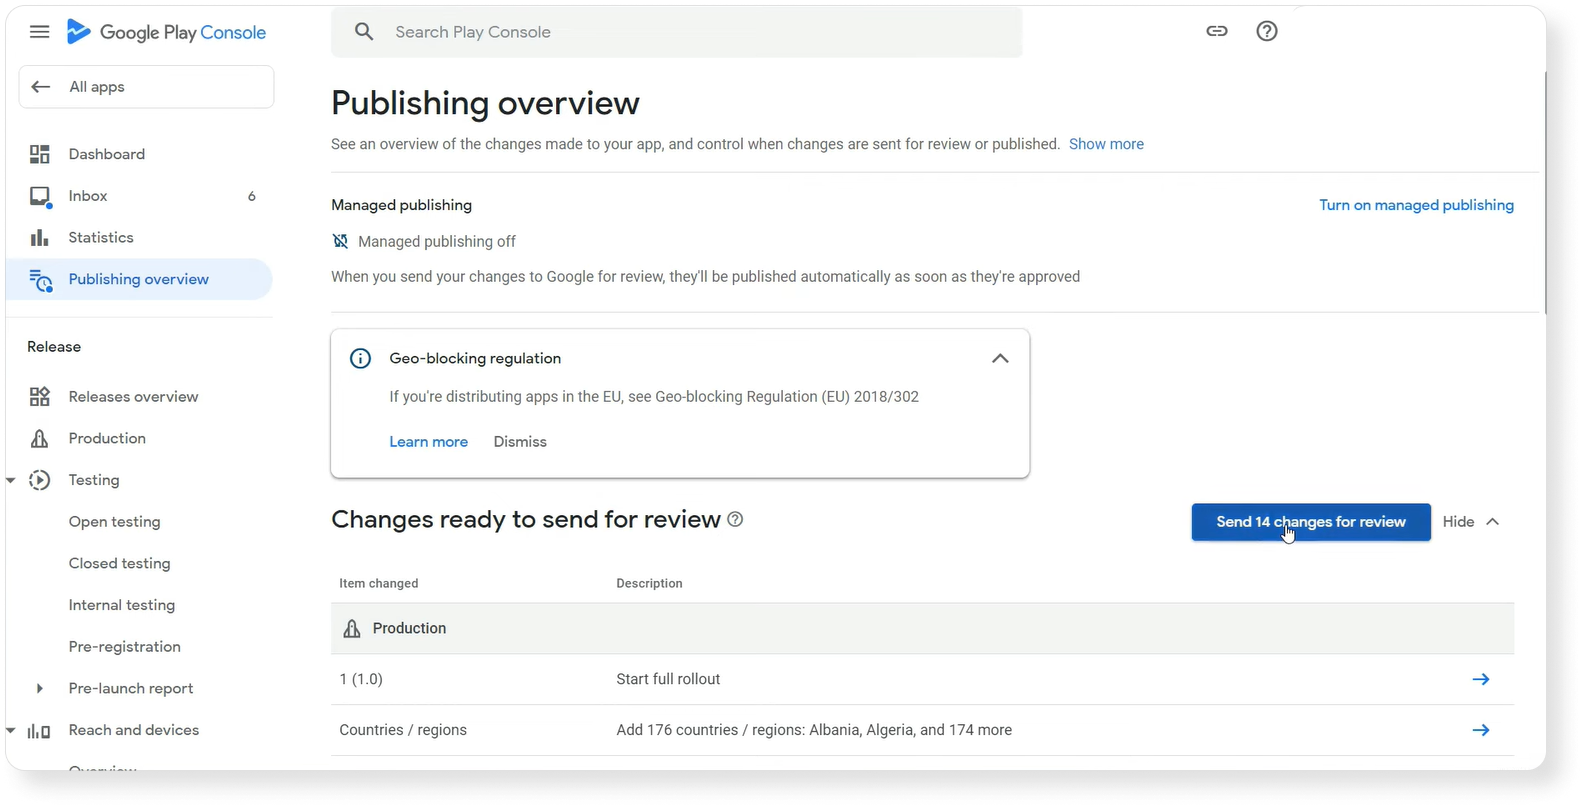
After correcting the mistakes, click “Save”. Google will redirect you to the “Releases” section. Here you need to click on “Go to Publishing preview”.
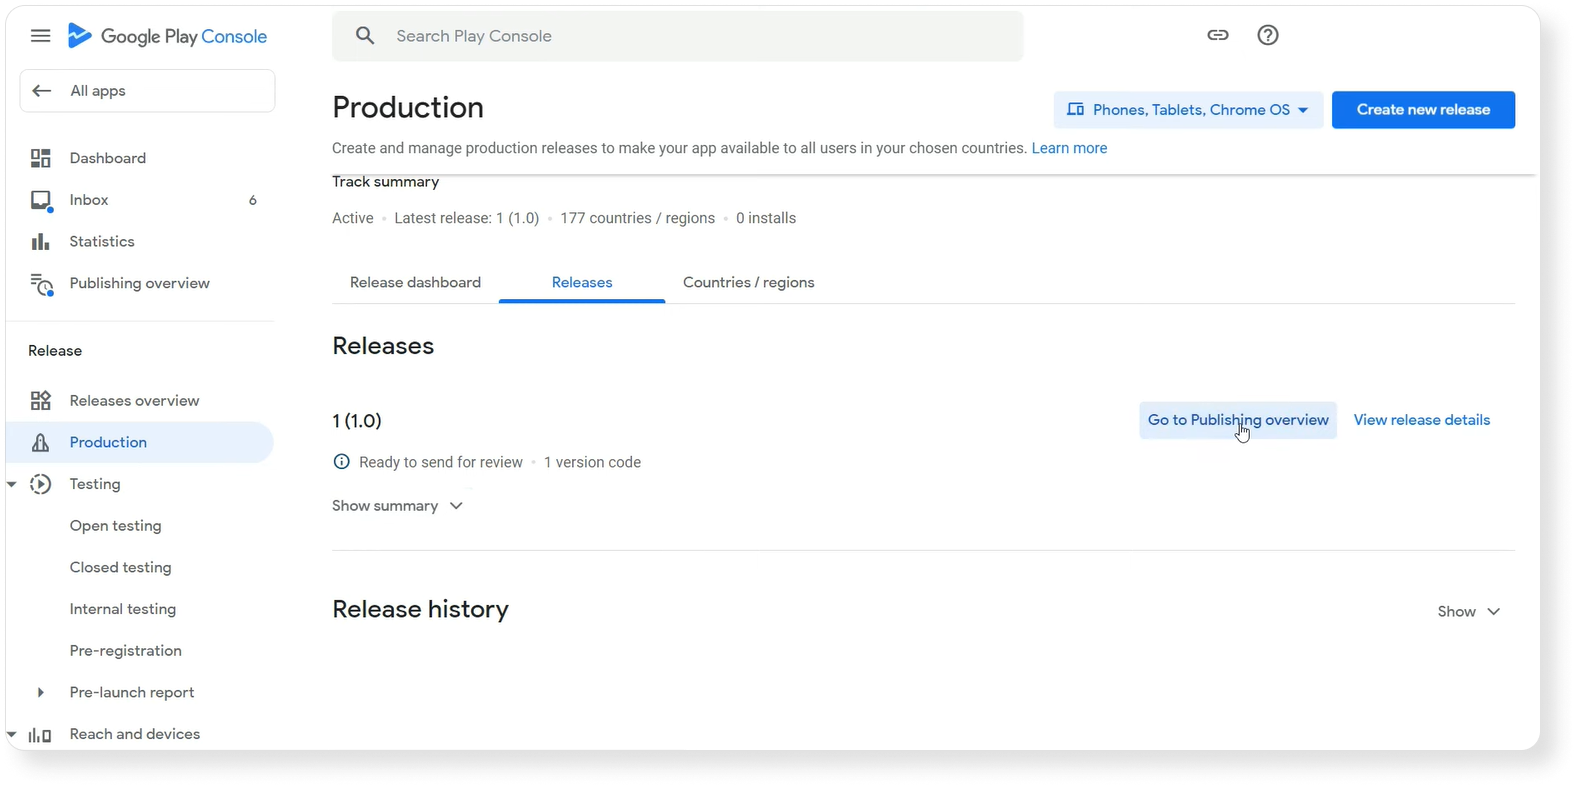
Follow the prompts that Google shows you.
Then click on the “Send changes for review” button.

Now you will see “In review” in the Update status. Once your app has been reviewed, you will see “Live” status.
That’s it, you’ve uploaded your app. Now you’ll need to wait for Google to approve it. Typically, this process can be completed within approximately 48 hours. Google mentions that the review procedure may extend up to 7 days or even longer in some cases.
How to publish your app on Google Play
1. Create your account in Google Play Developer Console and pay a $25 registration fee.
2. If you want to sell in-app subscriptions, create a Google Merchant Account.
3. Create an app in Google Play Console. Choose your app name and default language, indicate whether you want to create an app or game, whether it will be free or paid, and confirm declarations from Google.
4. Provide all information Google Play requests from you in the setup section. Provide a link to your privacy policy and answer questions about ads, target audience, content rating, data safety, and more.
5. Choose a category and tags for your app, as it will help you to promote your app.
6. Collect your semantic core and choose important keywords that you want to use in your app metadata.
7. Create textual metadata: app name, short description, and full description. Create visual metadata: icons, feature graphics, app screenshots, and video.
8. Test your app on a small audience and then publish your app on the Play Store.
Subscribe to our newsletter and receive regular updates on App Store Optimization news, as well as informative articles covering ASO, mobile marketing, and app review management.